OpenPnP Install
OpenPnP is a piece of open source software designed to control pick and place machines. It supports a wide range of machines, with many features found in high-end commercial software. You can find out more about it here.
![]()
Recommended Hardware
OpenPnP is designed to run on many different kinds of host computers. However, USB drivers and internal USB hub bandwith can vary between computers. We recommend using a Lenovo Thinkpad T470 running Ubuntu 20.04 LTS or Ubuntu 22.04 LTS for known good connectivity with your cameras, exposure control, and serial communication.
Install
Please use the OpenPnP version we link to in the instructions below. OpenPnP has many frequent updates, and some of them change or remove functionality. Keeping to our recommended version (2023-04-05 release) ensures that things work correctly and that this documentation is accurate for you. Also, this version has support for the LumenPnP feeders.
We highly recommend using Ubuntu Linux as the OS for running OpenPnP due to how well it handles communication with the cameras.
Linux (Ubuntu Install Guide)
- Download and install OpenPnP for Linux. Use the version here to ensure OpenPnP works with the LumenPnP Feeders: (Download .deb)(Download .tar.gz)
Linux Users
Linux requires two quick configuration steps to allow OpenPnP to run:
- In order for OpenPnP to communicate to the machine, the user must be added to the
dialoutgroup. This can be done by enteringsudo adduser [USERNAME] dialout(where[USERNAME]is the user you're logged in as) into terminal and restarting the computer. - OpenPnP requires that Java is installed. This can easily be done by entering
sudo apt-get install default-jdkinto terminal.
Note that if Java is not installed, OpenPnP will fail silently when you attempt to start by clicking on the icon.
-
Open OpenPnP and make sure it loads fully. Doing this will make sure that OpenPnP puts a configuration folder on your computer that we'll need in the next step.
-
OpenPnP might prompt you to download a new version. Click
CancelthenExitto this prompt. -
Close OpenPnP.
Windows
-
Download and install OpenPnP for Windows. Use the version here to ensure OpenPnP works with the LumenPnP Feeders: (Download 32 Bit .exe) (Download 64 Bit .exe)
-
Open OpenPnP and make sure it loads fully. Doing this will make sure that OpenPnP puts a configuration folder on your computer that we'll need in the next step.
-
OpenPnP might prompt you to download a new version. Click
CancelthenExitto this prompt. -
Close OpenPnP.
MacOS
-
Download and install OpenPnP for Mac. Use the version here to ensure OpenPnP works with the LumenPnP Feeders: (Download .dmg)
Mac Users
Because of a bug with how OpenPnP signs their releases, Mac users with ARM processors might experience a crash on boot, or not be able to access the cameras. You can still run OpenPnP by navigating to
Applications -> OpenPnPand right clicking on the OpenPnP app and selecting "Show Package Contents":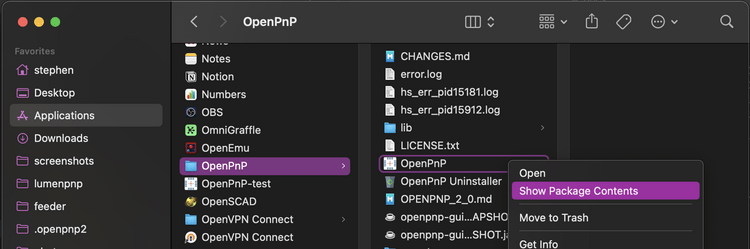 Then navigate to
 Contents -> MacOSand double click onJavaApplicationStubto run OpenPnP.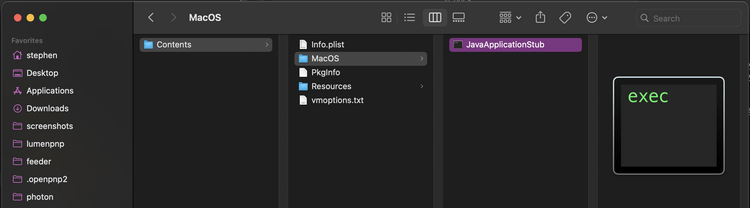
-
Open OpenPnP and make sure it loads fully. Doing this will make sure that OpenPnP puts a configuration folder on your computer that we'll need in the next step.
-
OpenPnP might prompt you to download a new version. Click
CancelthenExitto this prompt. -
Close OpenPnP.