Update Gcode Macros (V2/V3)
This does not apply to someone who has a V4.
OpenPnP puts general machine configuration in the same file as machine-specific configuration. This means that updating settings for your LumenPnP can also force you to redo calibration. To prevent this, this guide will walk you through which GCode macros to update so you don't need to start from scratch on calibration.
If you're setting up your machine for the first time, you don't need to do this. This guide is only for folks that are looking to update their machine config, but set up their machine using an older version of the configuration files.
OpenPnP Version
Be sure that you're using the recommended version of OpenPnP for this guide. You can find installation instructions here.
Firmware Version
These macros require that your firmware is up to date with the latest firmware release for your machine. Make sure you're up to date.
v3.1+ Machines
Version 3.1 and upward of the LumenPnP uses linear rails, so speeds and currents can be adjusted for faster movement. The four GCode macros that we'll edit to take advantage of these improvements are the CONNECT_COMMAND, HOME_COMMAND, and the ACTUATOR_READ_COMMAND for VAC1 and VAC2.
Connect Command (v3.1+)
-
Select the
DefaultandCONNECT_COMMANDdropdowns underMachine Setup > Drivers > GcodeDriver GcodeDriver > Gcode.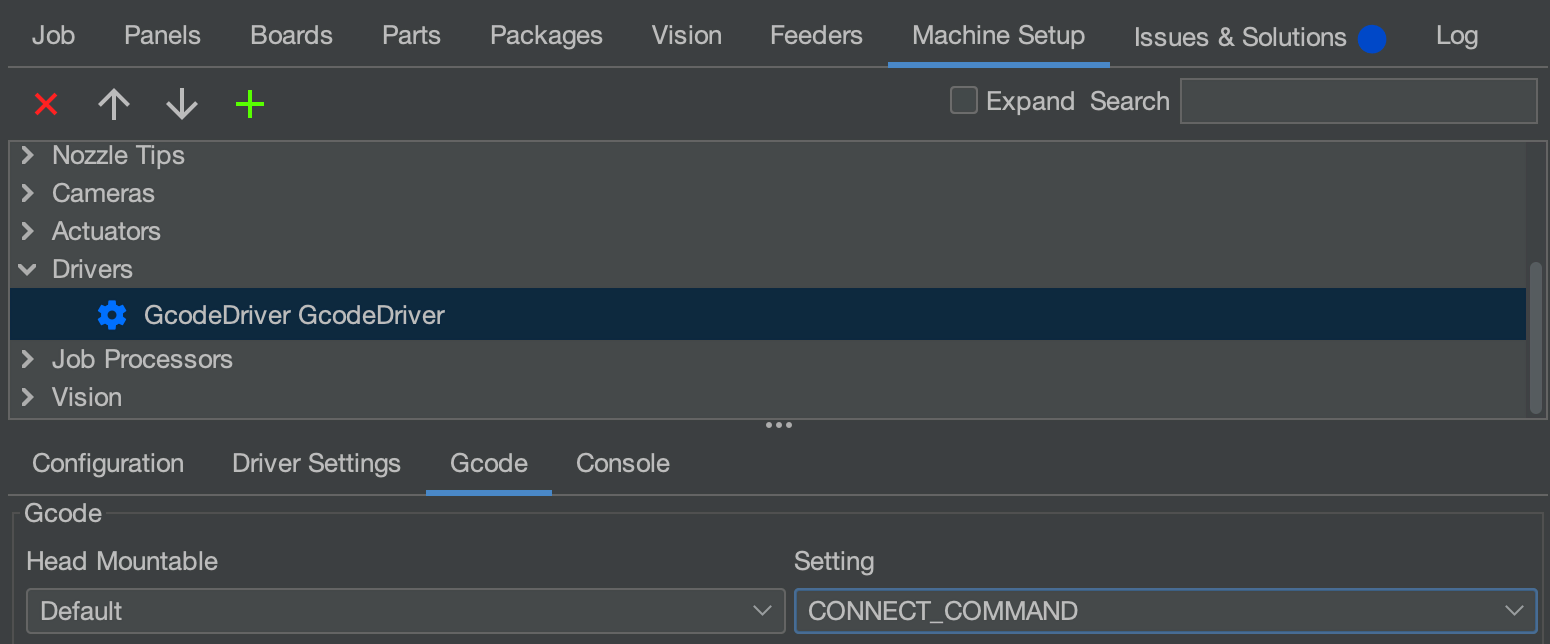
-
Paste the following Gcode into the text field:
G90 ; Set absolute positioning mode M260 A112 B1 S1 ; Selecting VAC1 through the I2C multiplexer M260 A109 ; Starts Command to VAC sensor at address 109 M260 B48 ; Address Byte 48 selects CMD register M260 B27 ; Sends byte to select 62.5 sleep time, SCO, sleep mode conversion (0001 1 011) M260 S1 ; Sends data M260 A112 B2 S1 ; Selecting VAC2 through the I2C multiplexer M260 A109 ; Starts Command to VAC sensor at address 109 M260 B48 ; Address Byte 48 selects CMD register M260 B27 ; Sends byte to select 62.5 sleep time, SCO, sleep mode conversion (0001 1 011) M260 S1 ; Sends data -
Click the
Applybutton in the bottom right.
Home Command (v3.1+)
-
Select the
DefaultandHOME_COMMANDdropdowns underMachine Setup > Drivers > GcodeDriver GcodeDriver > Gcode.
-
Paste the following Gcode into the text field:
M204 T2000 ; Sets acceleration for homing G28 X ; Home X in case of first boot G28 ; Home all axes -
Click the
Applybutton in the bottom right.
VAC1 and VAC2 Actuator Read Commands (v3.1+)
-
Select the
Actuator: H1 VAC1andACTUATOR_READ_COMMANDdropdowns underMachine Setup > Drivers > GcodeDriver GcodeDriver > Gcode.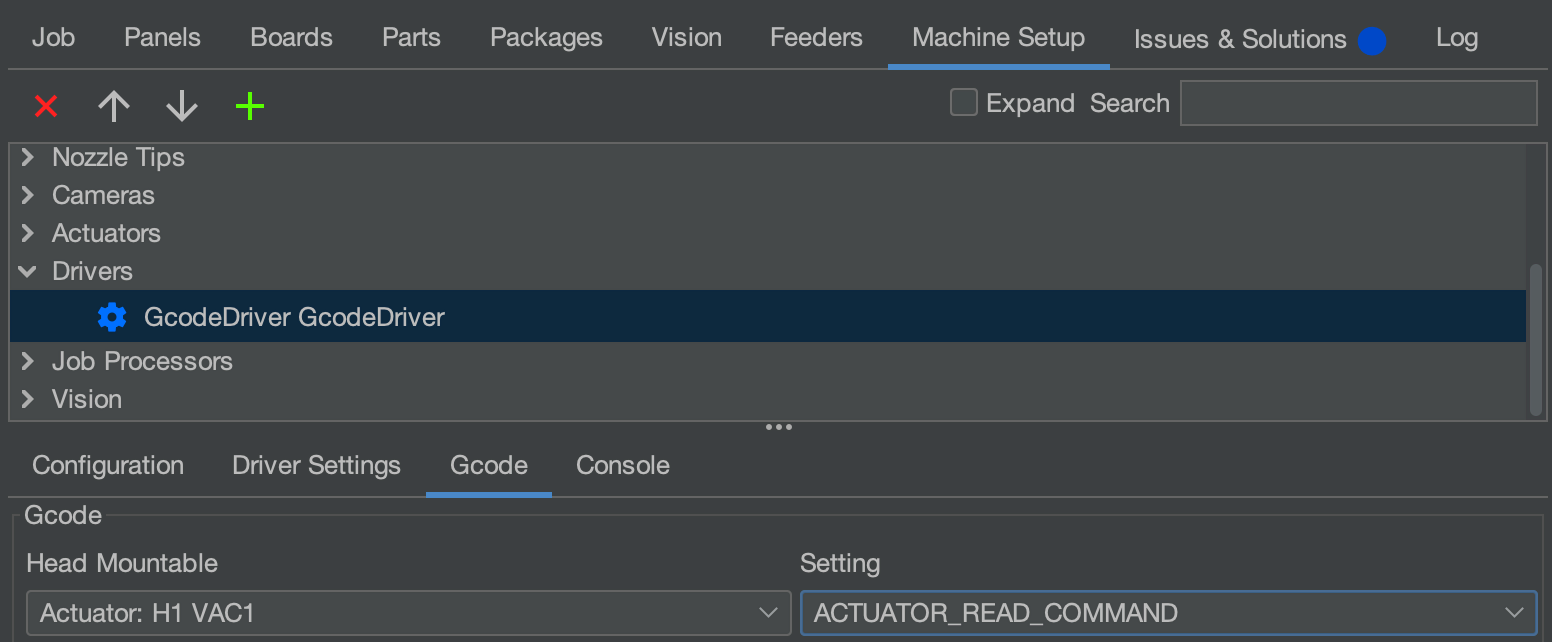
-
Paste the following Gcode into the text field:
M260 A112 B1 S1 ; Select vac1 through multiplexer M260 A109 B6 S1 ; Selects MSB register M261 A109 B1 S2 ; Request one byte back via decimal -
Click the
Applybutton in the bottom right. -
Select the
Actuator: H1 VAC2andACTUATOR_READ_COMMANDdropdowns underMachine Setup > Drivers > GcodeDriver GcodeDriver > Gcode.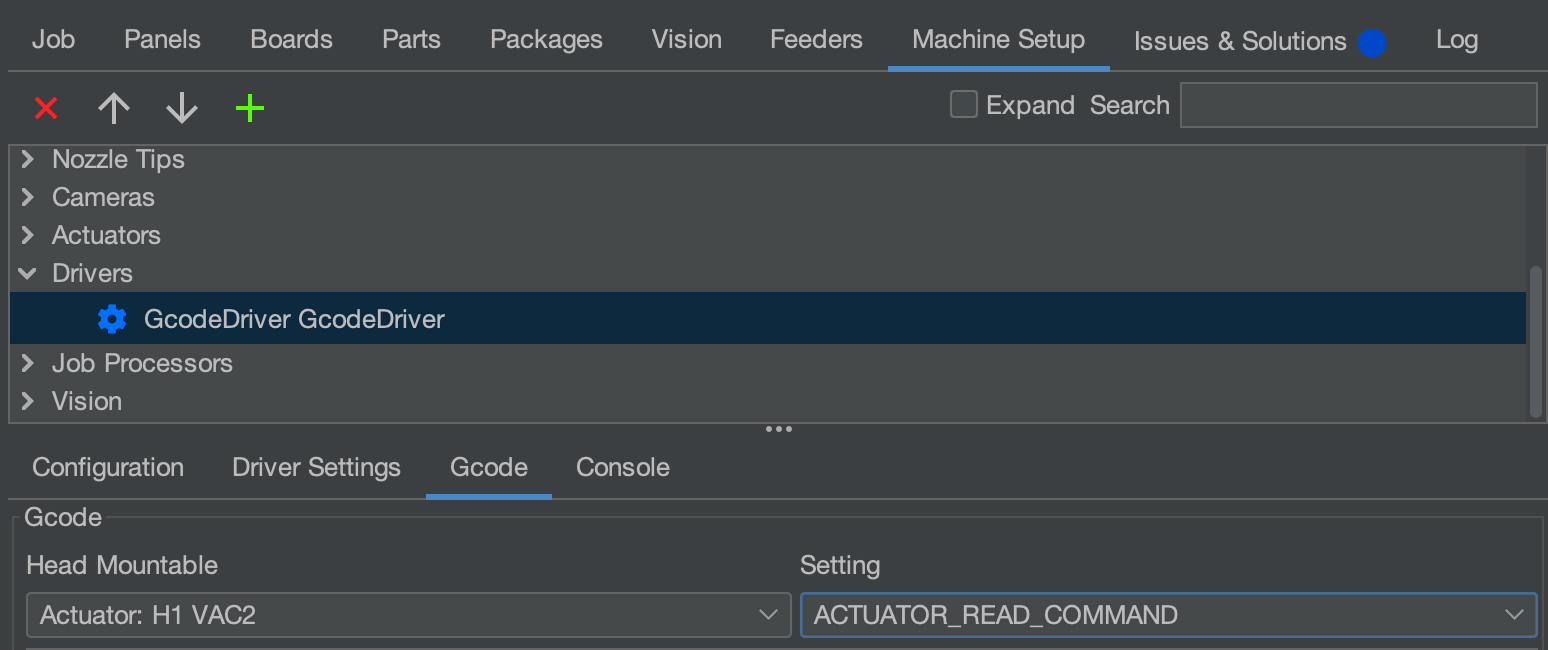
-
Paste the following Gcode into the text field:
M260 A112 B2 S1 ; Select vac1 through multiplexer M260 A109 B6 S1 ; Selects MSB register M261 A109 B1 S2 ; Request one byte back via decimal -
Click the
Applybutton in the bottom right.
v3.0 Machines
Version 3.0.0 - 3.0.5 of the LumenPnP uses the REV04 motherboard, which uses integrated vacuum sensors and sensorless homing. The four GCode macros that we'll edit to take advantage of these improvements are the CONNECT_COMMAND, HOME_COMMAND, and the ACTUATOR_READ_COMMAND for VAC1 and VAC2.
Connect Command (v3.0)
-
Select the
DefaultandCONNECT_COMMANDdropdowns underMachine Setup > Drivers > GcodeDriver GcodeDriver > Gcode. -
Paste the following Gcode into the text field:
G90 ; Set absolute positioning mode M260 A112 B1 S1 ; Selecting VAC1 through the I2C multiplexer M260 A109 ; Starts Command to VAC sensor at address 109 M260 B48 ; Address Byte 48 selects CMD register M260 B27 ; Sends byte to select 62.5 sleep time, SCO, sleep mode conversion (0001 1 011) M260 S1 ; Sends data M260 A112 B2 S1 ; Selecting VAC2 through the I2C multiplexer M260 A109 ; Starts Command to VAC sensor at address 109 M260 B48 ; Address Byte 48 selects CMD register M260 B27 ; Sends byte to select 62.5 sleep time, SCO, sleep mode conversion (0001 1 011) M260 S1 ; Sends data -
Click the
Applybutton in the bottom right.
Home Command (v3.0)
-
Select the
DefaultandHOME_COMMANDdropdowns underMachine Setup > Drivers > GcodeDriver GcodeDriver > Gcode. -
Paste the following Gcode into the text field:
M204 T2000 ; Sets acceleration for homing G28 X ; Home X in case of first boot G28 ; Home all axes -
Click the
Applybutton in the bottom right.
VAC1 and VAC2 Actuator Read Commands (v3.0)
-
Select the
Actuator: H1 VAC1andACTUATOR_READ_COMMANDdropdowns underMachine Setup > Drivers > GcodeDriver GcodeDriver > Gcode. -
Paste the following Gcode into the text field:
M260 A112 B1 S1 ; Select vac1 through multiplexer M260 A109 B6 S1 ; Selects MSB register M261 A109 B1 S2 ; Request one byte back via decimal -
Click the
Applybutton in the bottom right. -
Select the
Actuator: H1 VAC2andACTUATOR_READ_COMMANDdropdowns underMachine Setup > Drivers > GcodeDriver GcodeDriver > Gcode. -
Paste the following Gcode into the text field:
M260 A112 B2 S1 ; Select vac1 through multiplexer M260 A109 B6 S1 ; Selects MSB register M261 A109 B1 S2 ; Request one byte back via decimal -
Click the
Applybutton in the bottom right.