MM/Pixel Calibration
![]()
This next step calibrates the relationship between pixels and millimeters to make our cameras more accurate.
The main reason for needing to perform the mm to pixel calibration is to translate pixel data into accurate, real-world measurements (like millimeters). This allows for reliable sizing of objects, quality control, and dimensional analysis in computer vision by correcting for lens distortions and establishing a precise scale factor, which is crucial for tasks needing quantifiable results beyond just visual identification.
Top Camera MM/Pixel Calibration
In this step, we will calibrate the mm/pixels for the Top Camera. This requires us to set the dimensions and use a virtual bounding box to outline and measure one of the squares on the datum board, known as a golden guideline square. This allows us to calibrate the top camera’s Units per pixel, giving us accurate top camera movement.
-
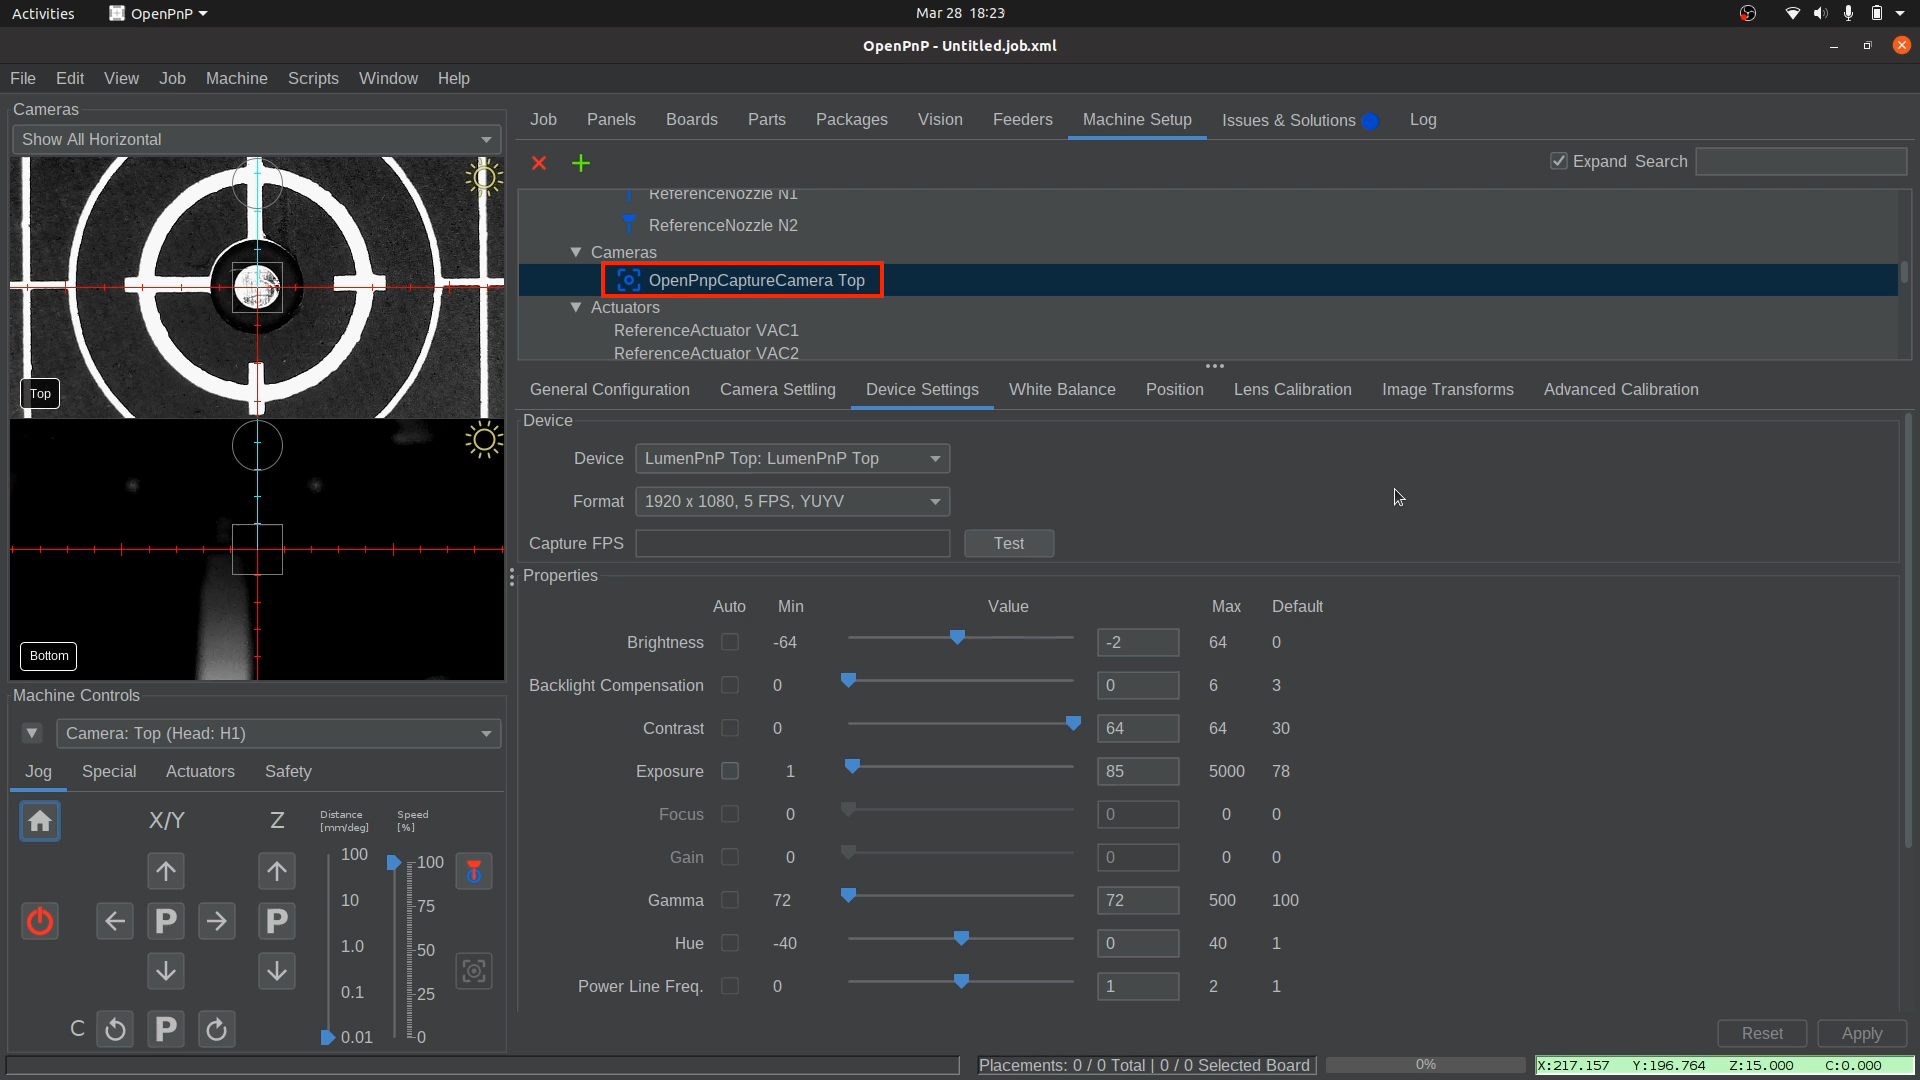
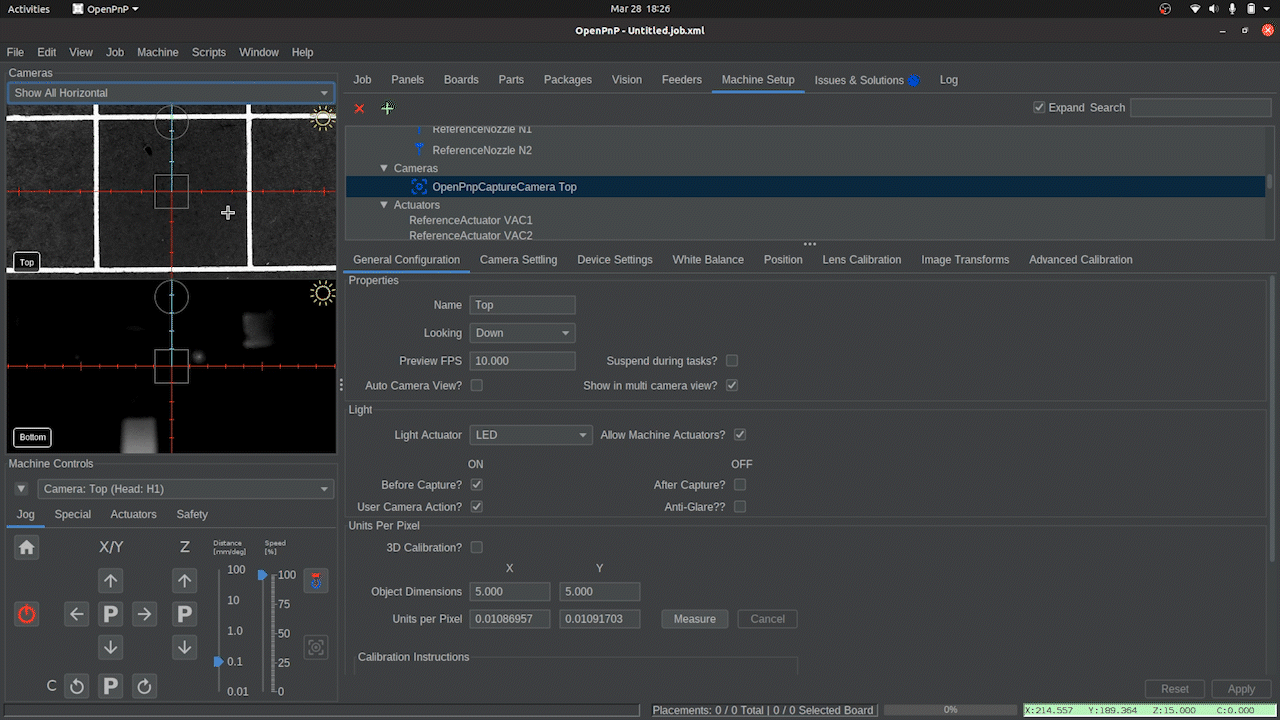
Select the Top Camera.
- Confirm that your
Top Camerais still centered on yourHoming Fiducial - Navigate to
Machine Setup > Heads > ReferenceHeadH1 > Cameras > OpenPnPCaptureCamera Top.
- Confirm that your
-
Click on the
General Configurationtab.

-
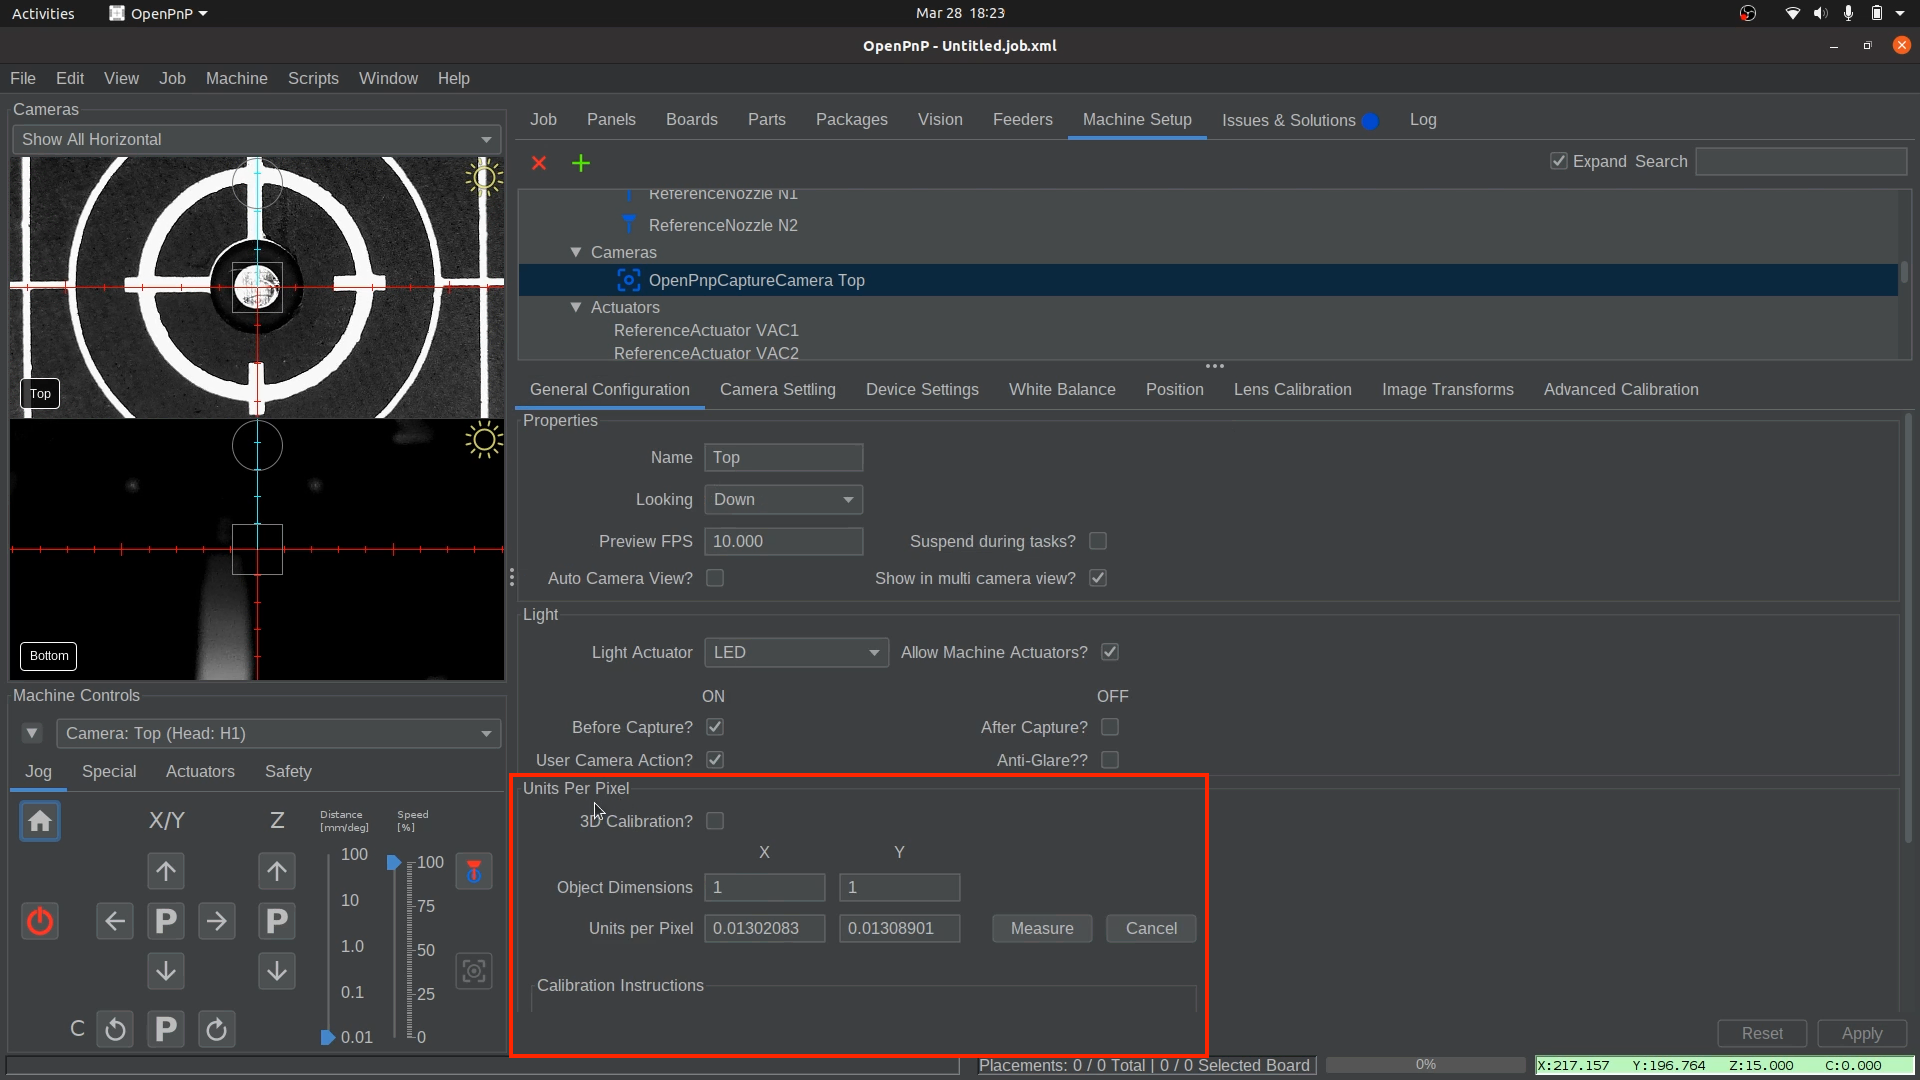
Scroll down to the
Units Per Pixelsection.- Locate the Object Dimension Fields for X and Y.
- Locate the Object Dimension Fields for X and Y.
-
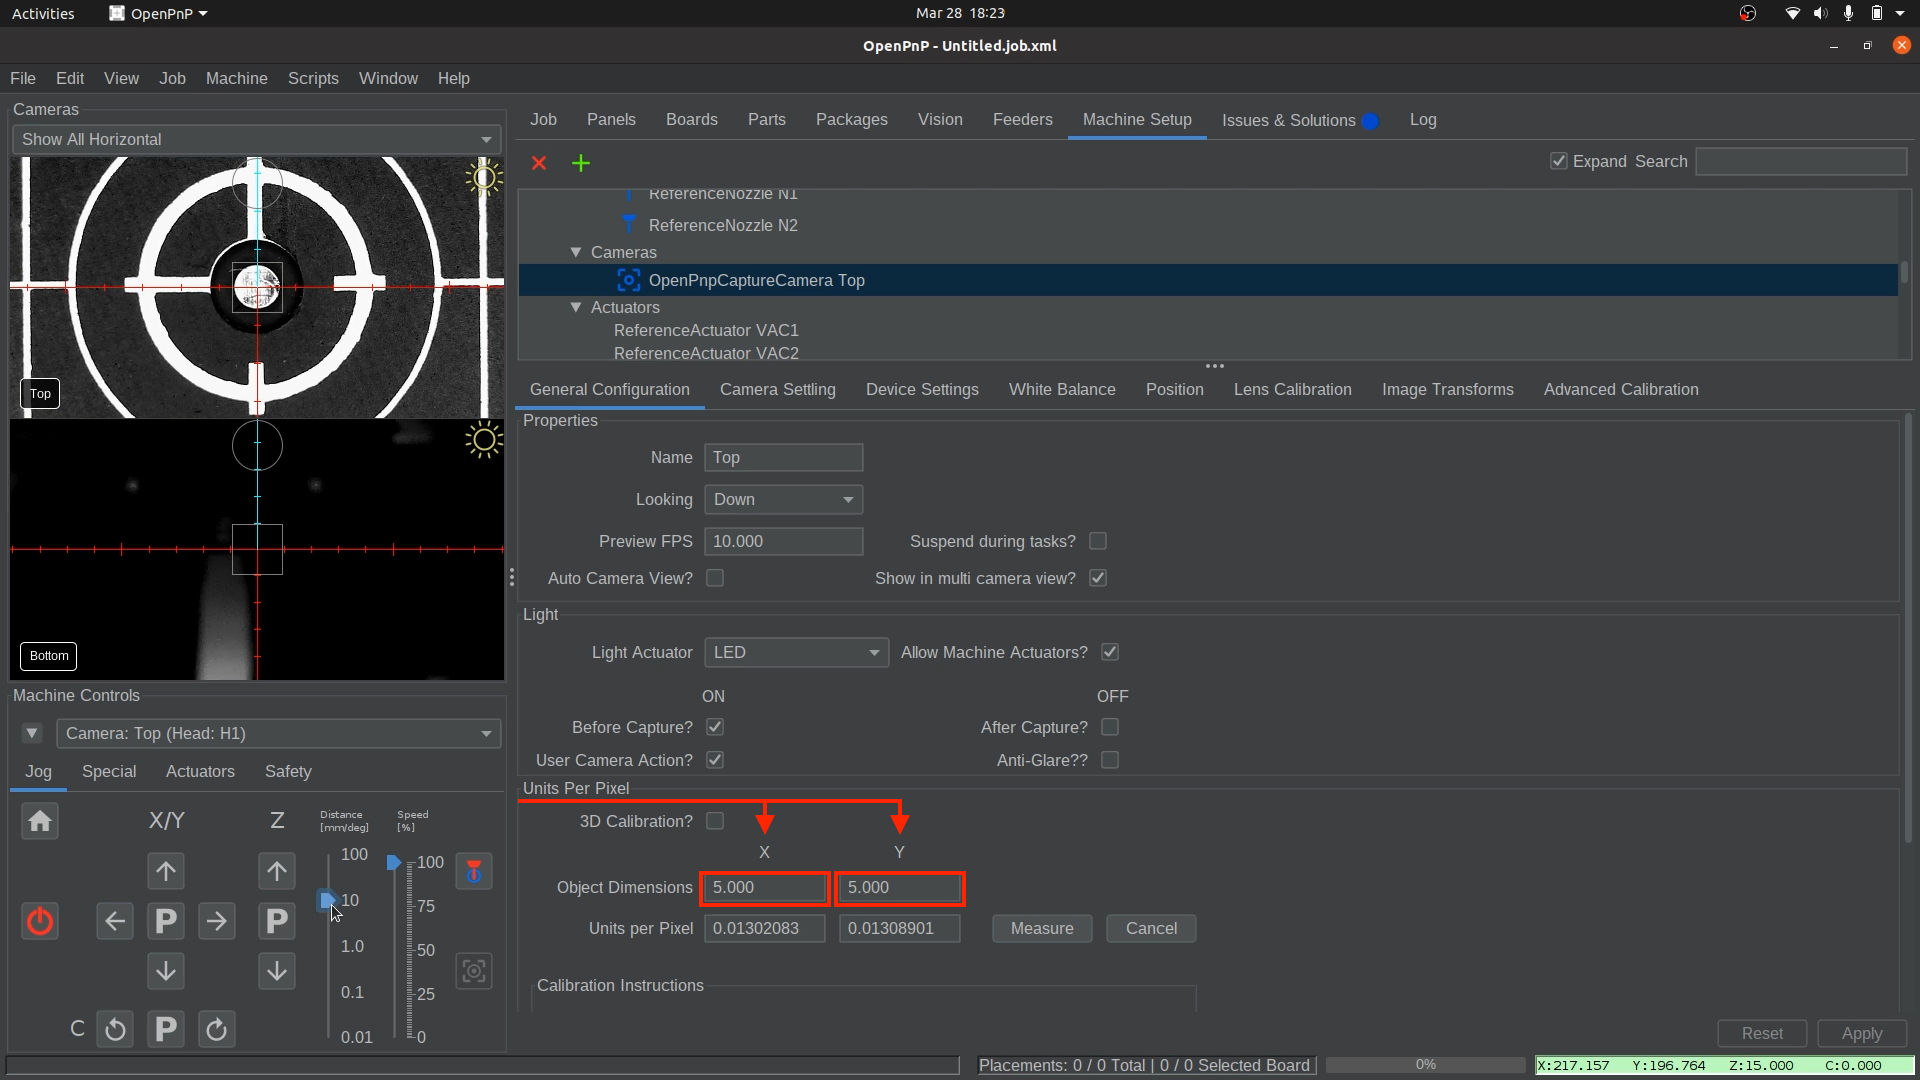
Set the Object Dimensions.
- In the X Object Dimension field, enter
5. - In the Y Object Dimension field, enter
5. - Double-check that both X and Y are set correctly before proceeding.
- In the X Object Dimension field, enter
-
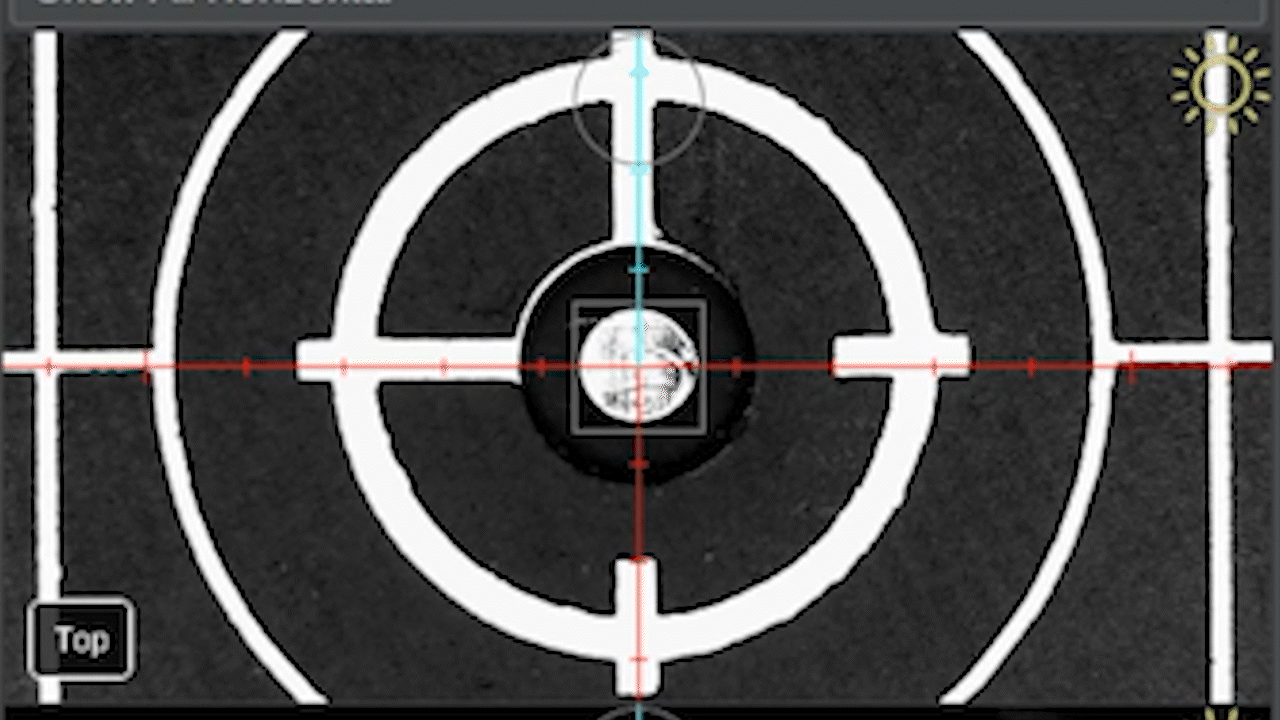
Locate a calibration square to be measured.
- Jog the machine until a golden guideline square is fully visible in the top camera view. The square should be roughly centered in the camera's reticles. The whole square must be visible. If necessary, use the scroll wheel to zoom out and ensure the entire square is visible.
- In
Machine Controls, you can adjust theDistance Sliderto jog in larger or smaller increments when locating the golden guideline square.
-
Align and Measure.
- locate and click the
Measurebutton.
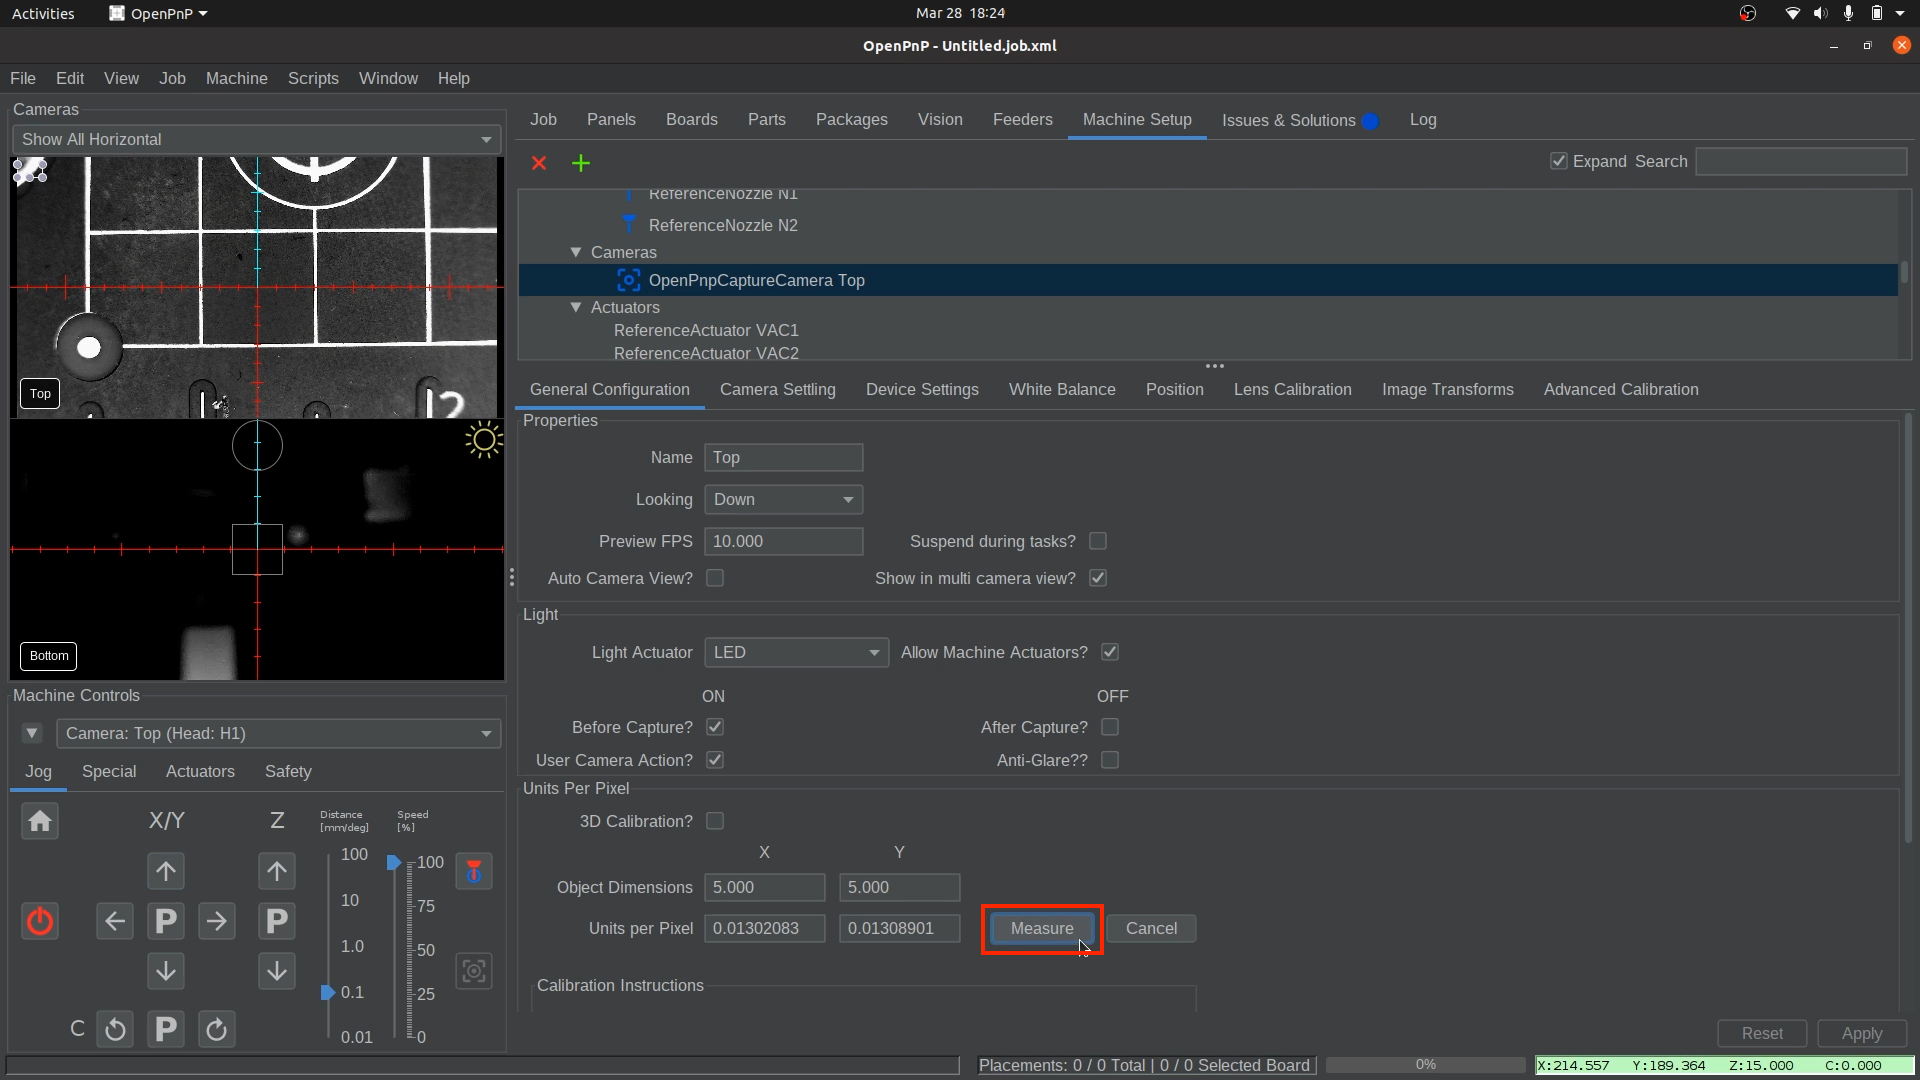
- Click and drag in the camera view to create a bounding box. Align it with the center of the golden guideline square to align with the lines along its edge. The square is exactly 5mm x 5mm.
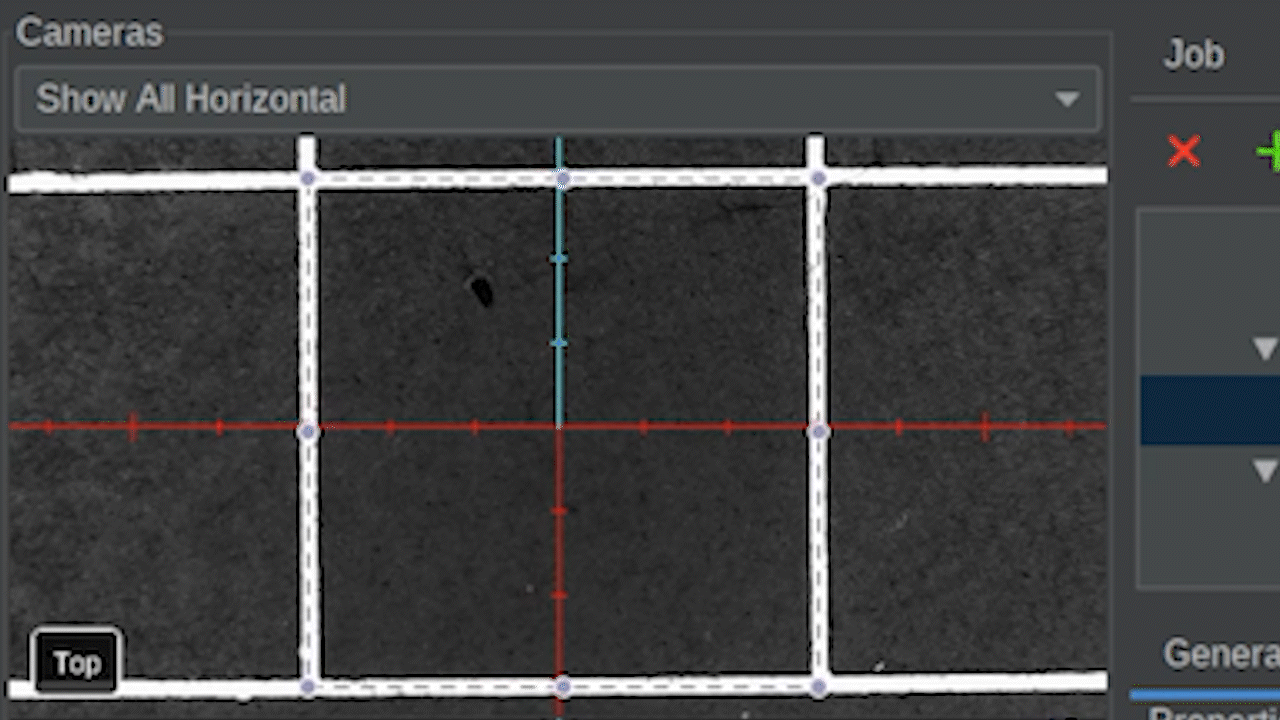
Squareness
Don't worry if the box's square doesn't perfectly align with the camera image. Any slight skew will be adjusted for during jobs with fiducial calibration.
- locate and click the
-
Finalize Calibration.
- Once you have it perfectly outlined, click the
Measurebutton again to update the Units Per Pixel values.
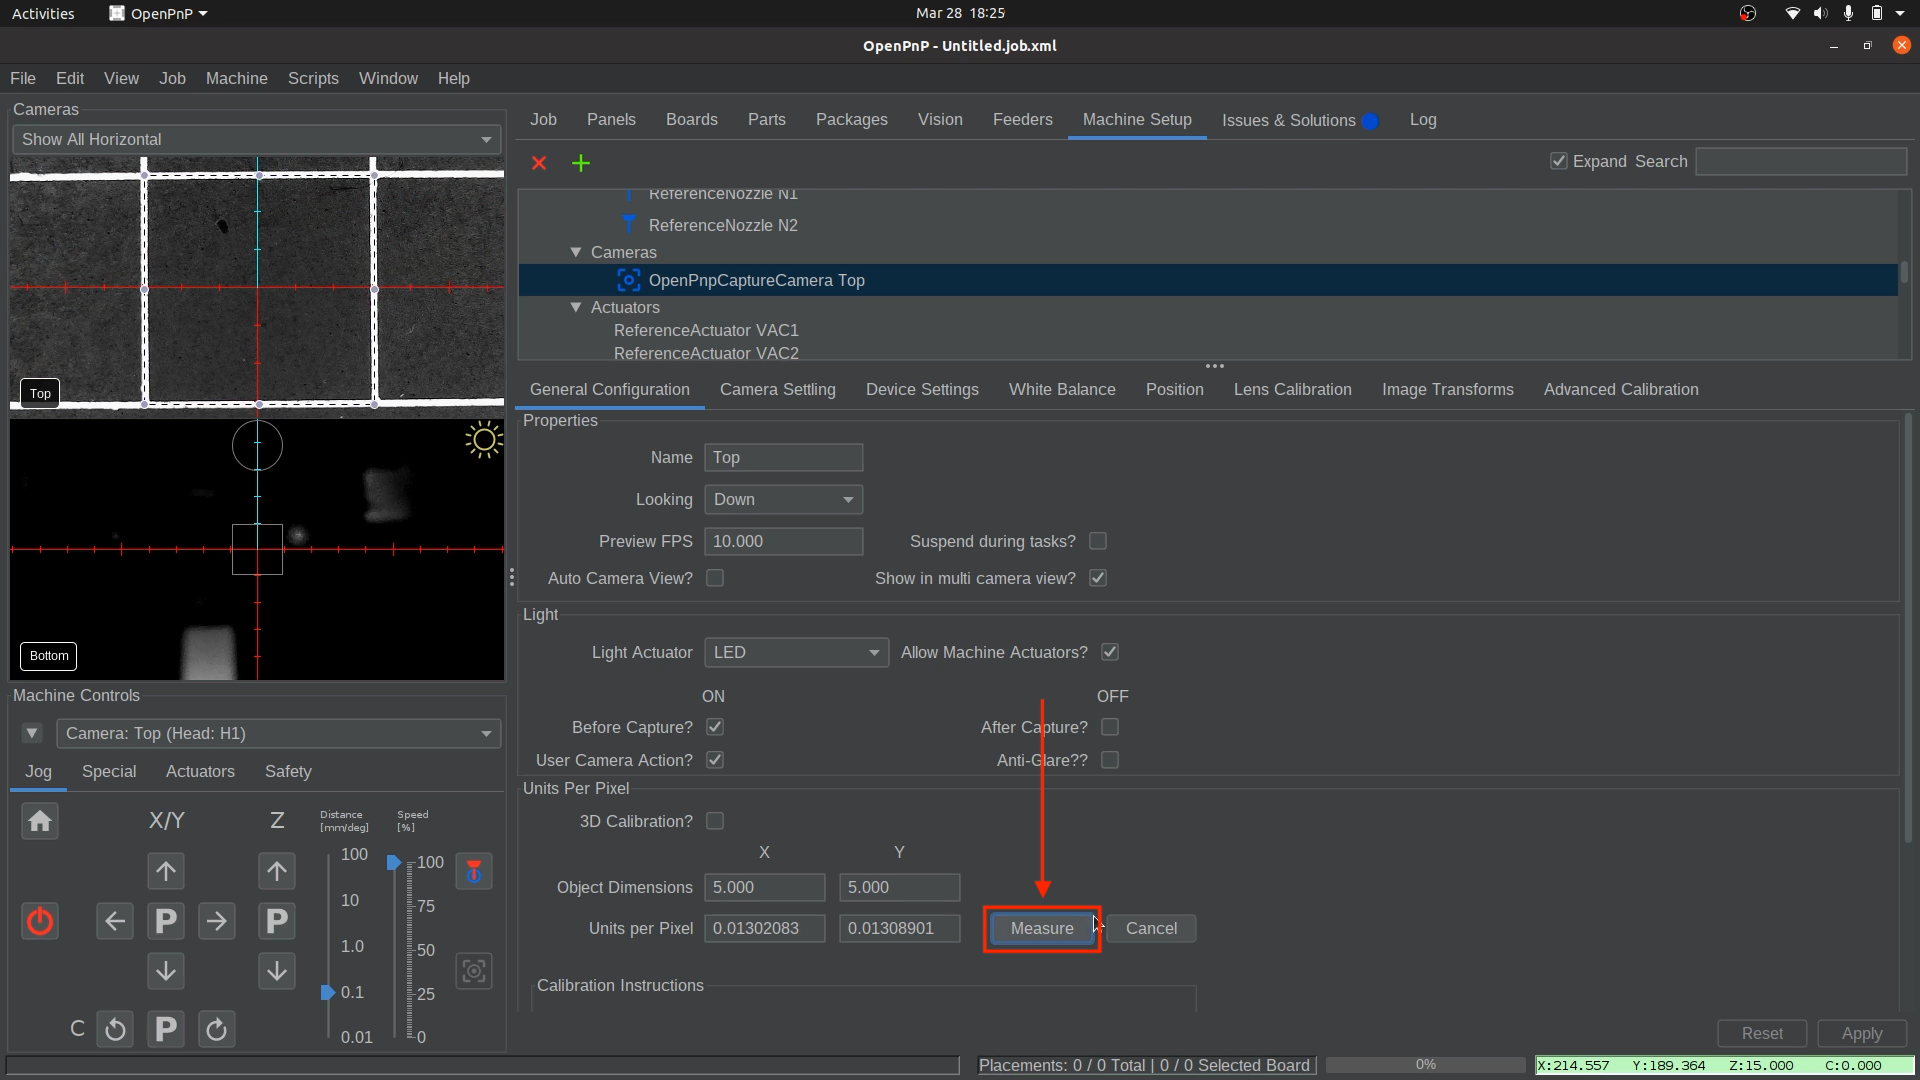
- Click
Applyin the lower right corner to save your changes.
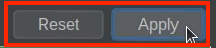
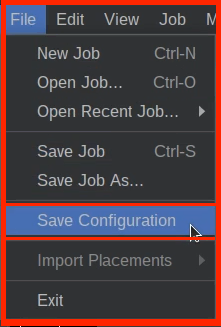
- Save your OpenPnP configuration now.
File > Save Configuration.
- Once you have it perfectly outlined, click the
Validate Top Camera Calibration
Lets verify the top camera calibration was successful. This will ensure the top camera's millimeter per pixel is accurate so it is moving the correct amount for a given command.
-
Ensure your top camera view is fully zoomed out.
- Hover over the top camera's feed, and scroll with the mouse wheel or trackpad to zoom all the way out.
-
Confirm top camera is calibrated correctly.
- Click and drag the center reticle (located in the middle of the camera feed) to one of the corners of the Golden Guideline Square.
- If the mm/pixel calibration is correct, the Top Camera will move to be precisely over your chosen corner.
Bottom Camera MM/Pixel Calibration
The following steps will calibrate the mm/pixels for the Bottom Camera. This requires us to set the dimensions and use a virtual bounding box to outline the nozzle tip. This allows us to calibrate the bottom camera’s Units per pixel, giving us accurate bottom camera movement.
-
Home your machine using the "Home" button.
- The LumenPnP will perform the homing process and position the top camera over the homing fiducial. In future steps, the homing sequence will also scan the nozzle tips after calibrating the homing fiducial, but for now, it should only scan the homing fiducial.
-
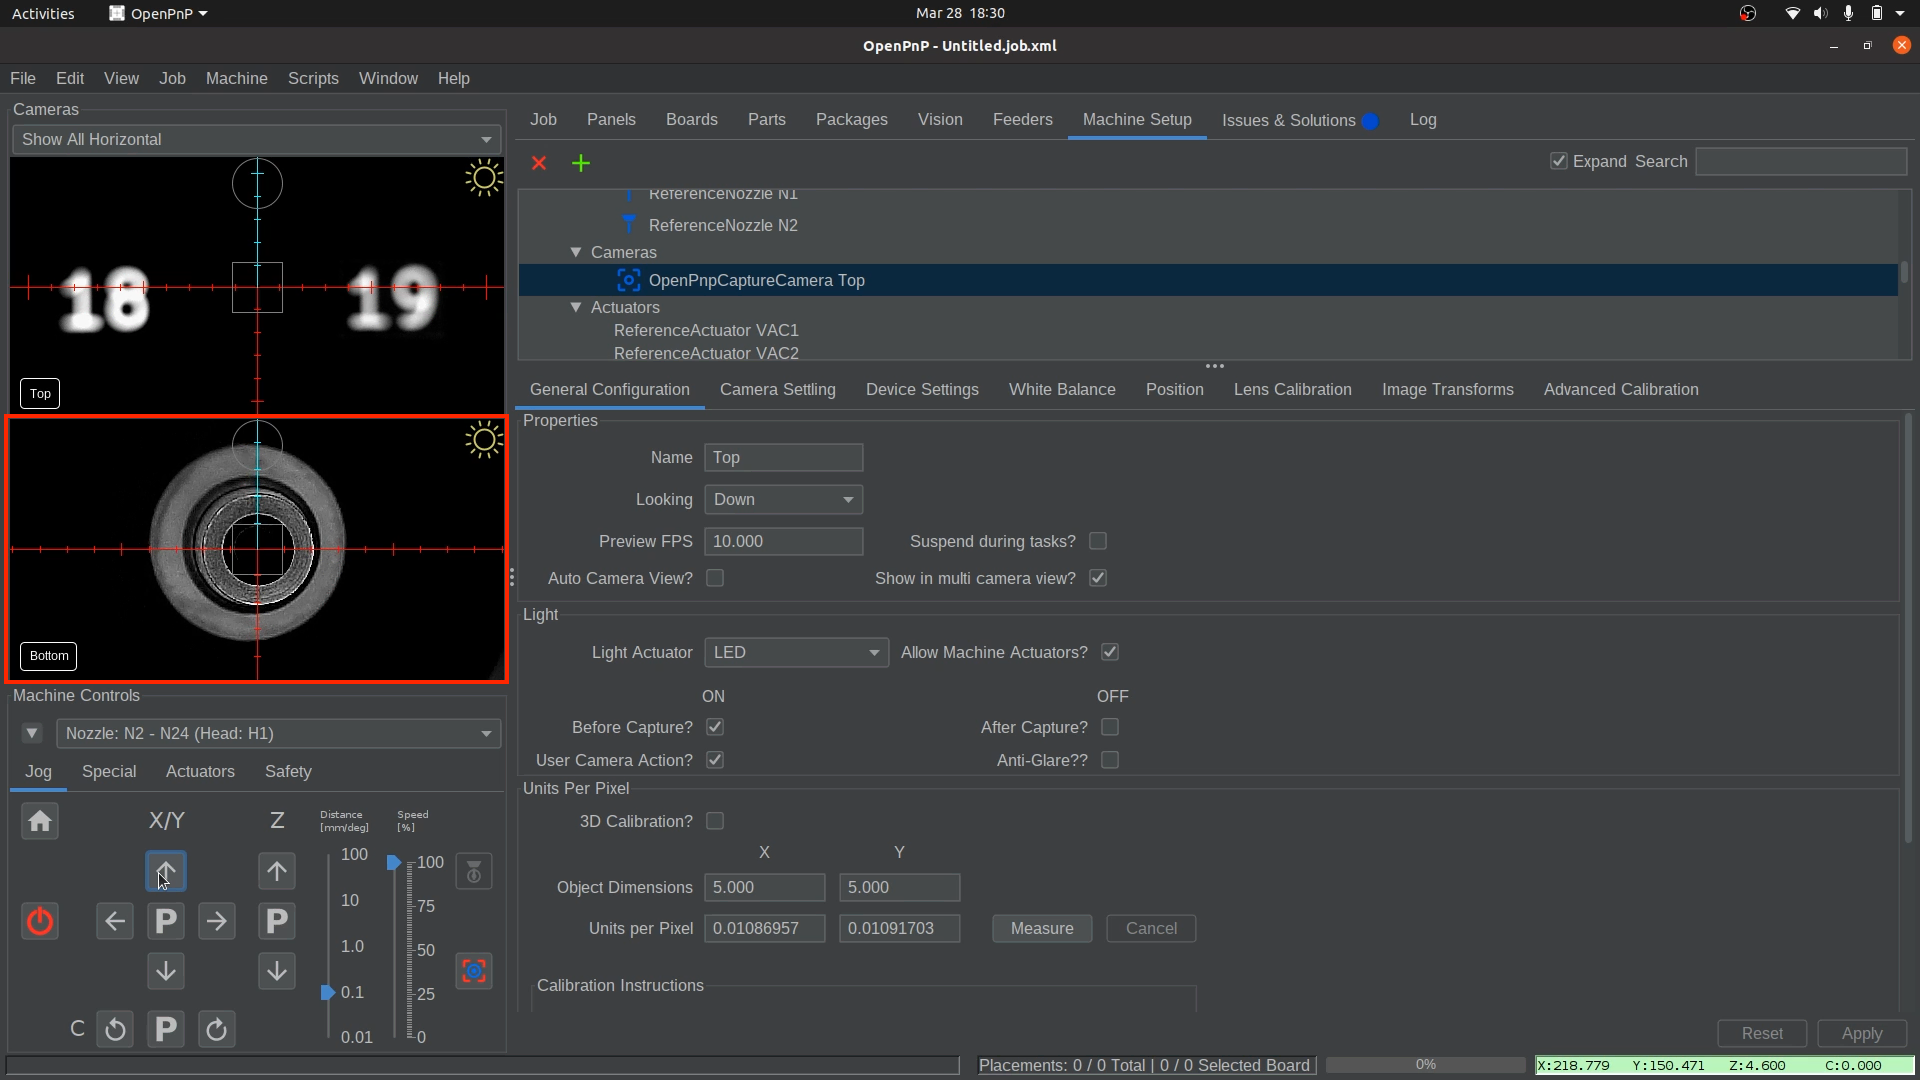
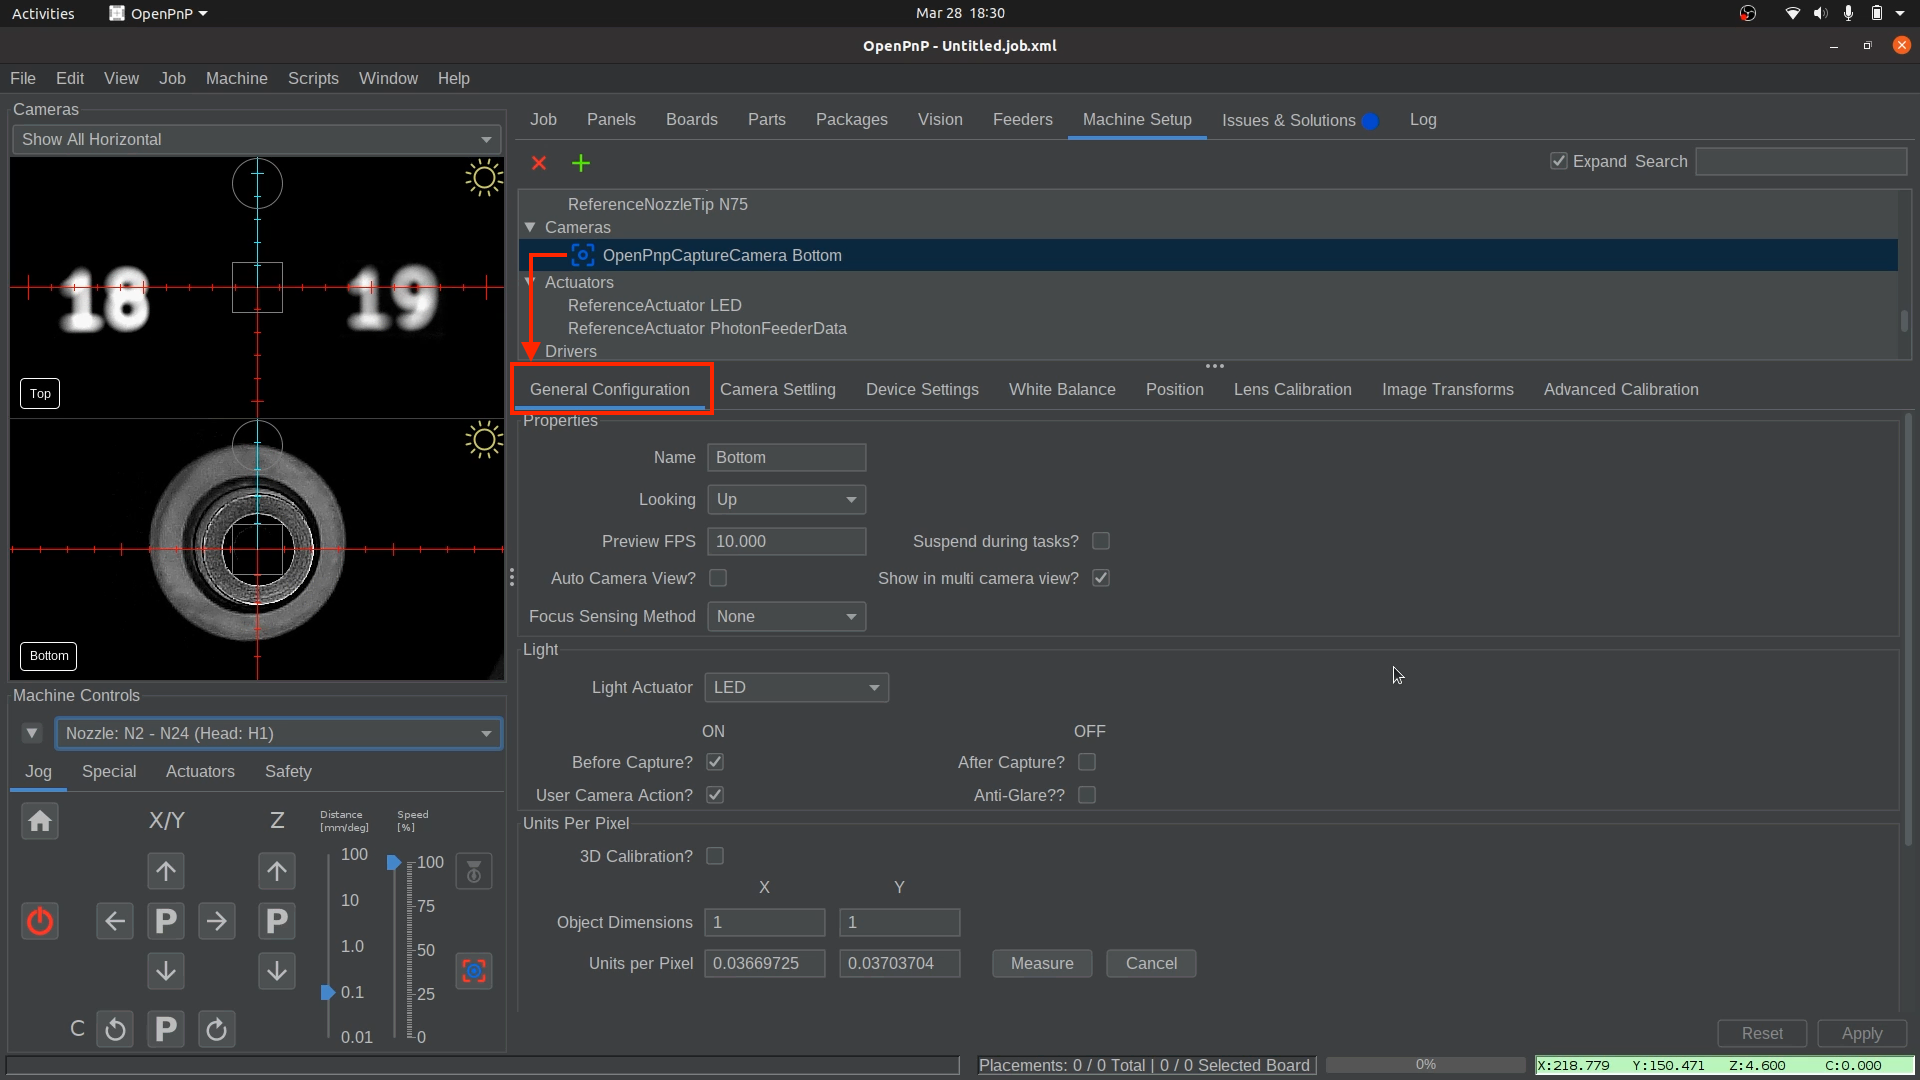
Select the bottom Camera.
- Navigate to
Machine Setup > Cameras > OpenPnPCaptureCamera Bottom
- Navigate to
-
Access the Position Tab.
- Click on the Position tab to begin setting the bottom camera’s location.
- Enter
31.5into theZ position field. (This step is specific to any LumenPnP V3 machine, and is vital that it is set to 31.5.)

-
Save the 31.500 Z Position
- Click
Applyin the lower right corner to save the bottom camera position in OpenPnP.
- Click
-
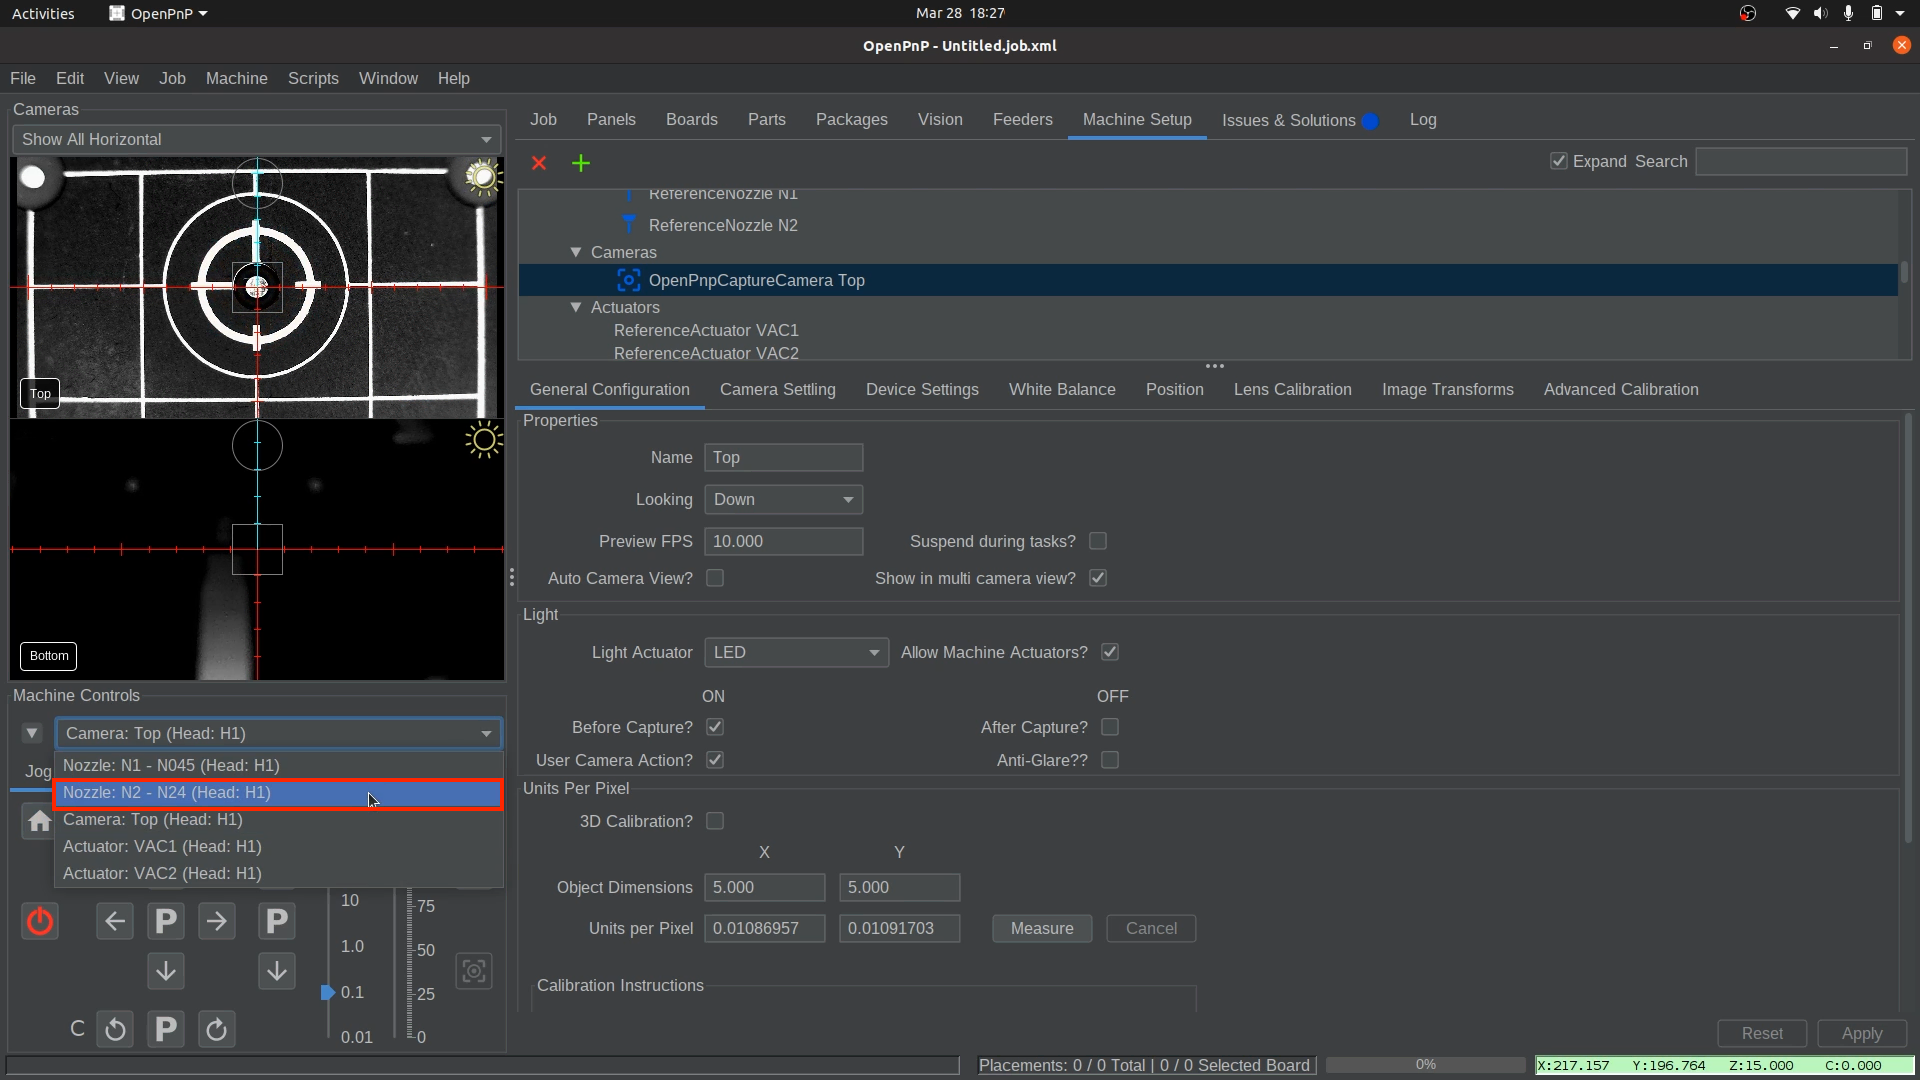
Select Nozzle: N2 (Right Nozzle).
- In the drop-down under
Machine Controls, selectNozzle: N2 - N24 (Head: H1)to control the nozzle on the right. This way, for any nozzle commands we run, OpenPnP knows to base them on Nozzle: N2 and not the other nozzle.
- In the drop-down under
-
Align Nozzle Tip Over the Bottom Camera.
- In the
Position Tab, click on the button to bring the nozzle tip over the bottom camera. This will jog the Nozzle: N2 (right toolhead) to be roughly over the bottom camera.

- In
Machine Controls, Use the arrows to center the nozzle tip in the bottom camera feed.
Fine-Tuning Focus
The bottom camera’s focus is pre-adjusted before shipping, but you can fine-tune it if needed. loosen the set-screw in the side and slightly rotate the bottom camera lens until the image appears sharp.
- In the
-
Go to the
General Configurationtab.- Navigate to
Machine Setup > Cameras > OpenPnPCaptureCamera Bottom - Select the
General Configurationtab.
- Navigate to
-
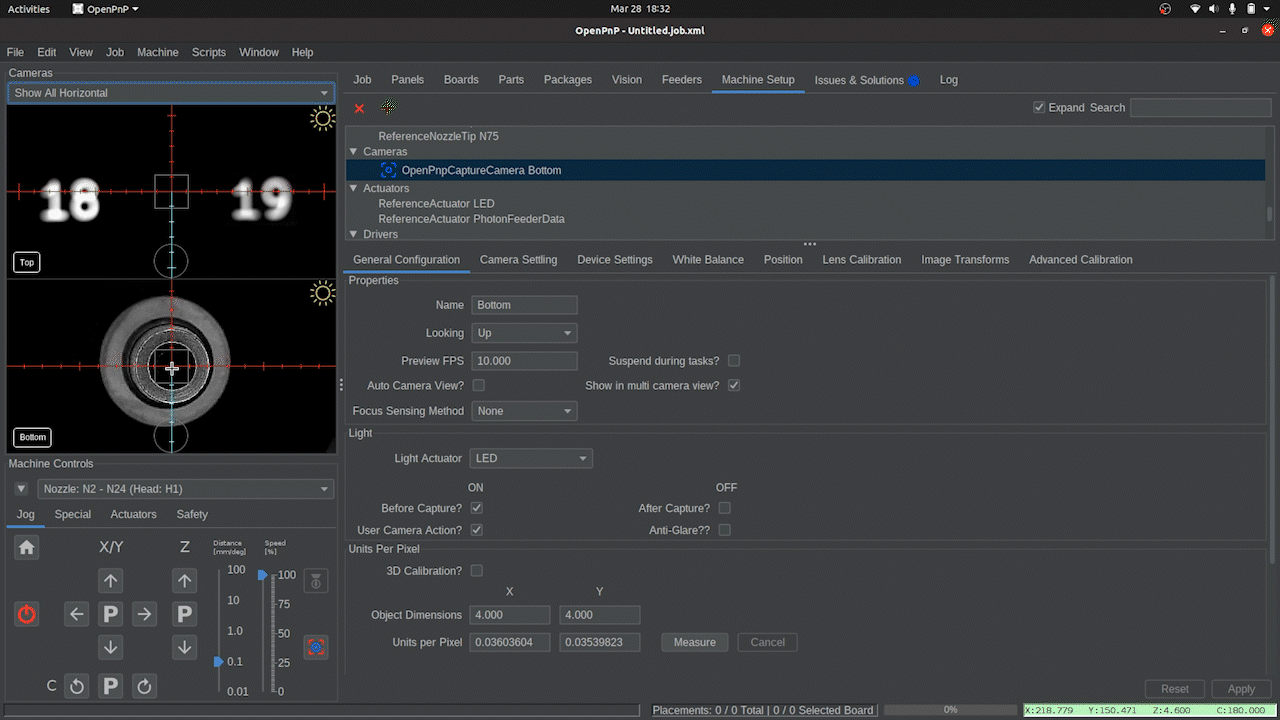
Scroll down to the
Units Per Pixelsection.- Locate the Object Dimension Fields for X and Y.
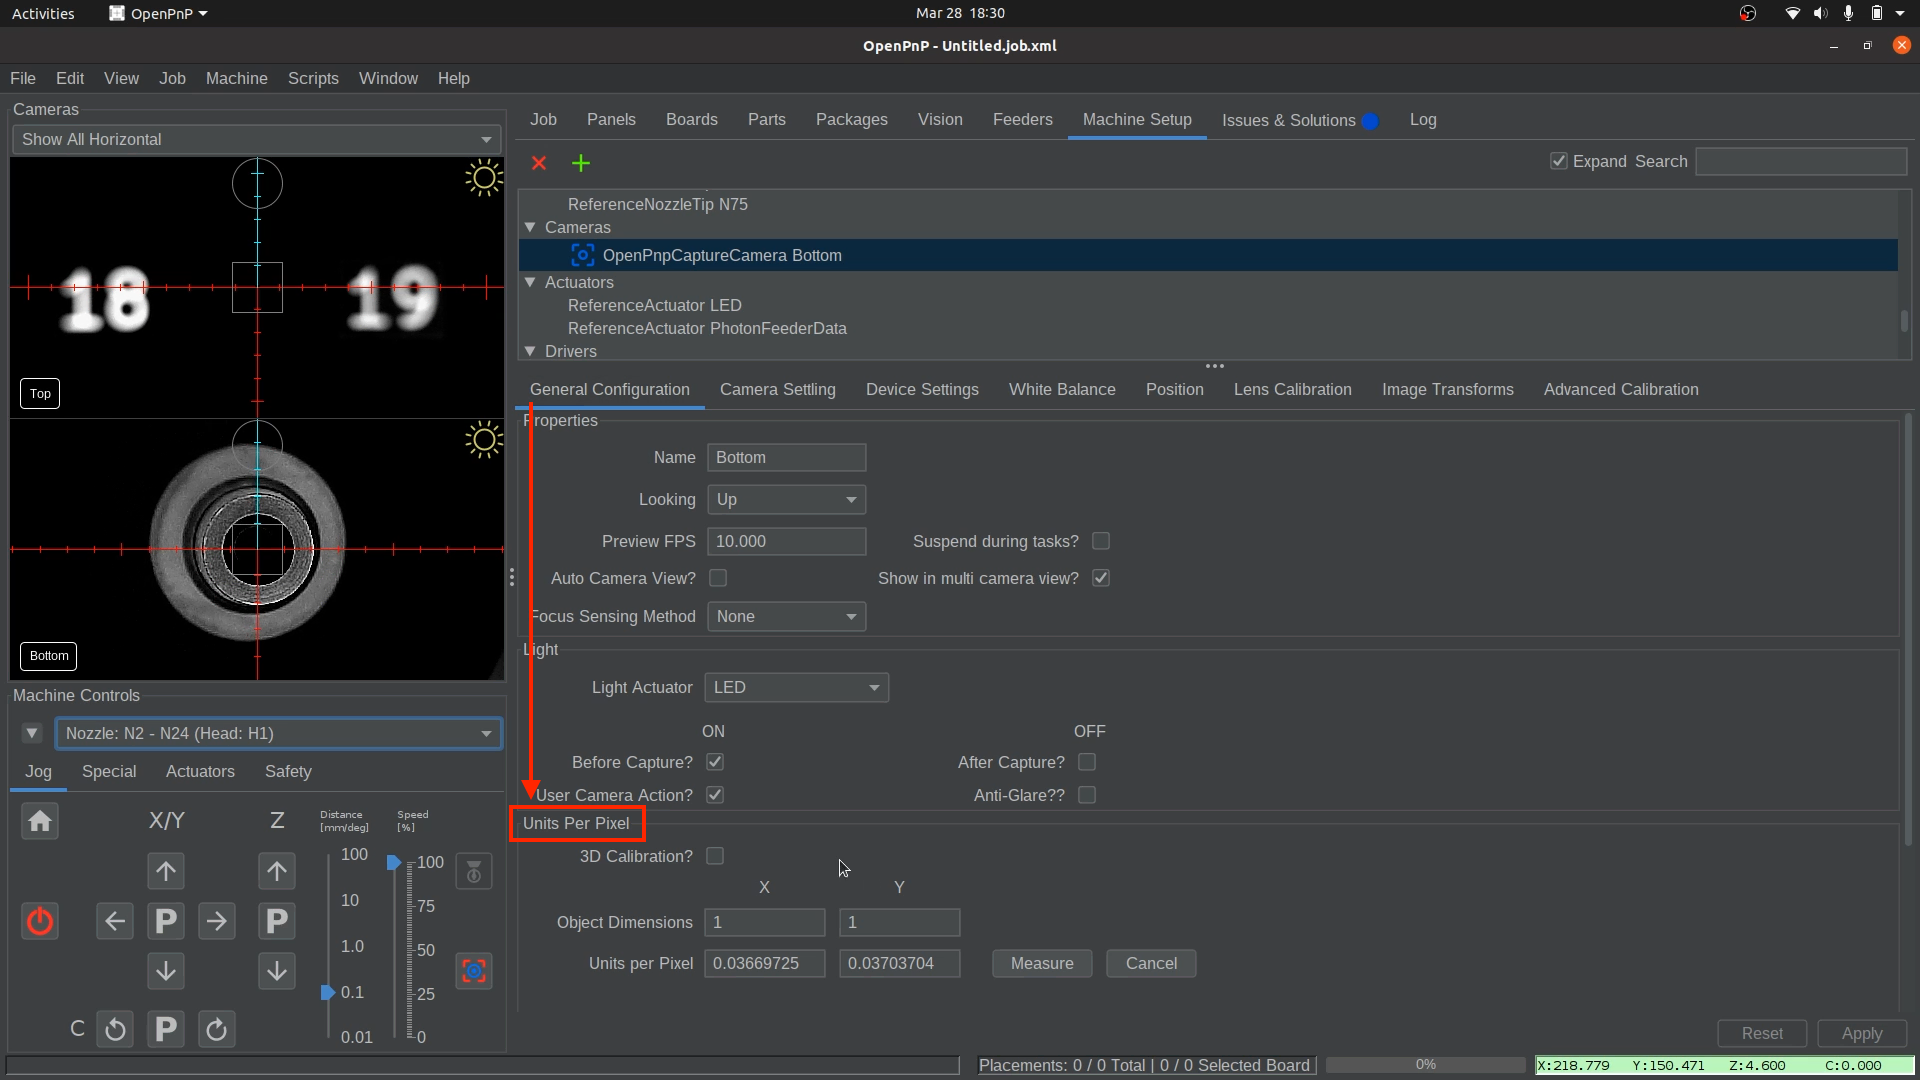
- Locate the Object Dimension Fields for X and Y.
-
Set the Object Dimensions
- In the X Object Dimension field, enter
4. - In the Y Object Dimension field, enter
4. - Double-check that both X and Y are set correctly before proceeding.
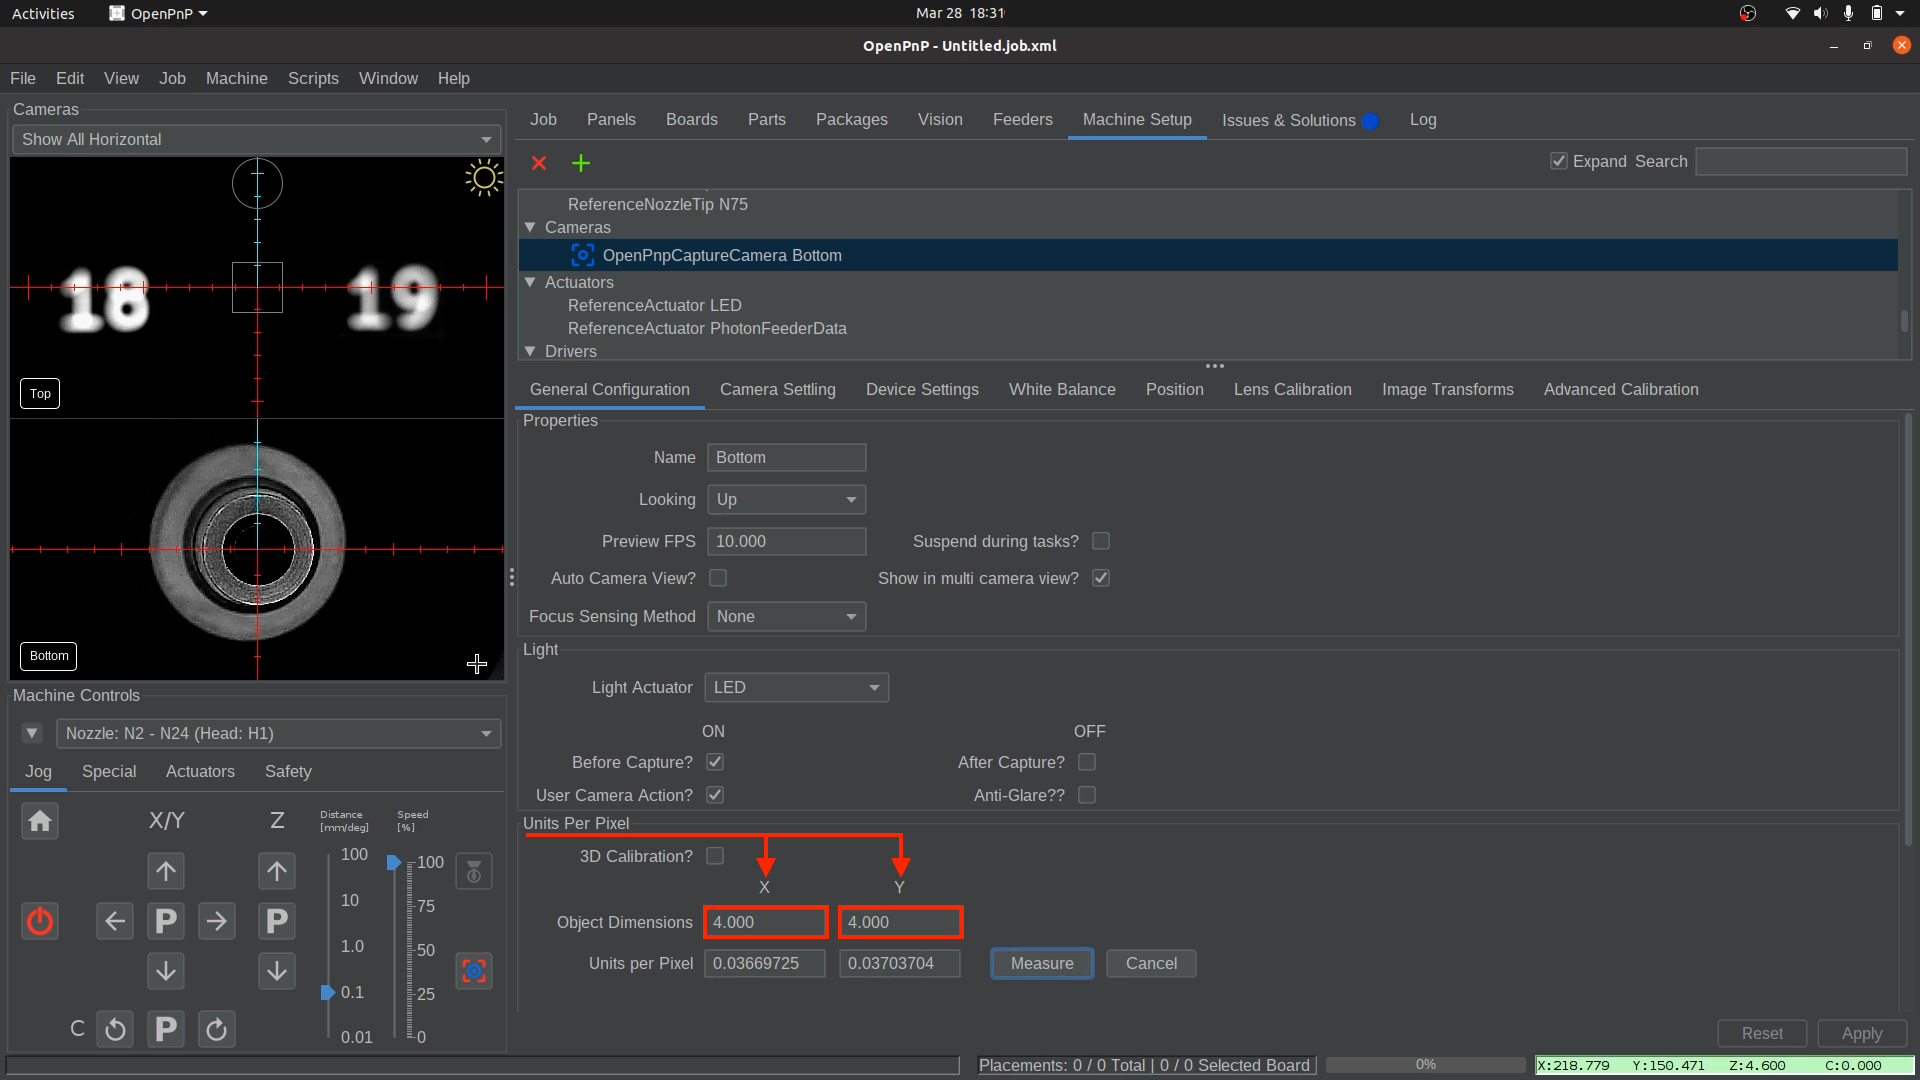
- In the X Object Dimension field, enter
-
Align and Measure
- locate and click the
Measurebutton.

- Click and drag in the camera view to create a bounding box. Align it with the center of the nozzle tip so that it's perfectly tangent to the edges as shown in the image.
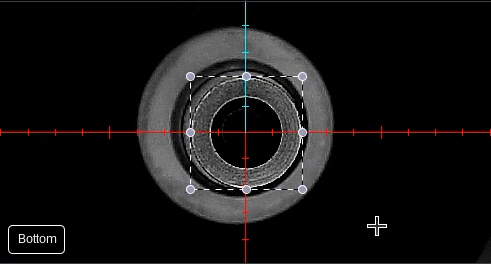
- locate and click the
-
Finalize Bottom Camera Calibration
- Once you have it perfectly outlined, click the
Measurebutton again to update the Units Per Pixel values.
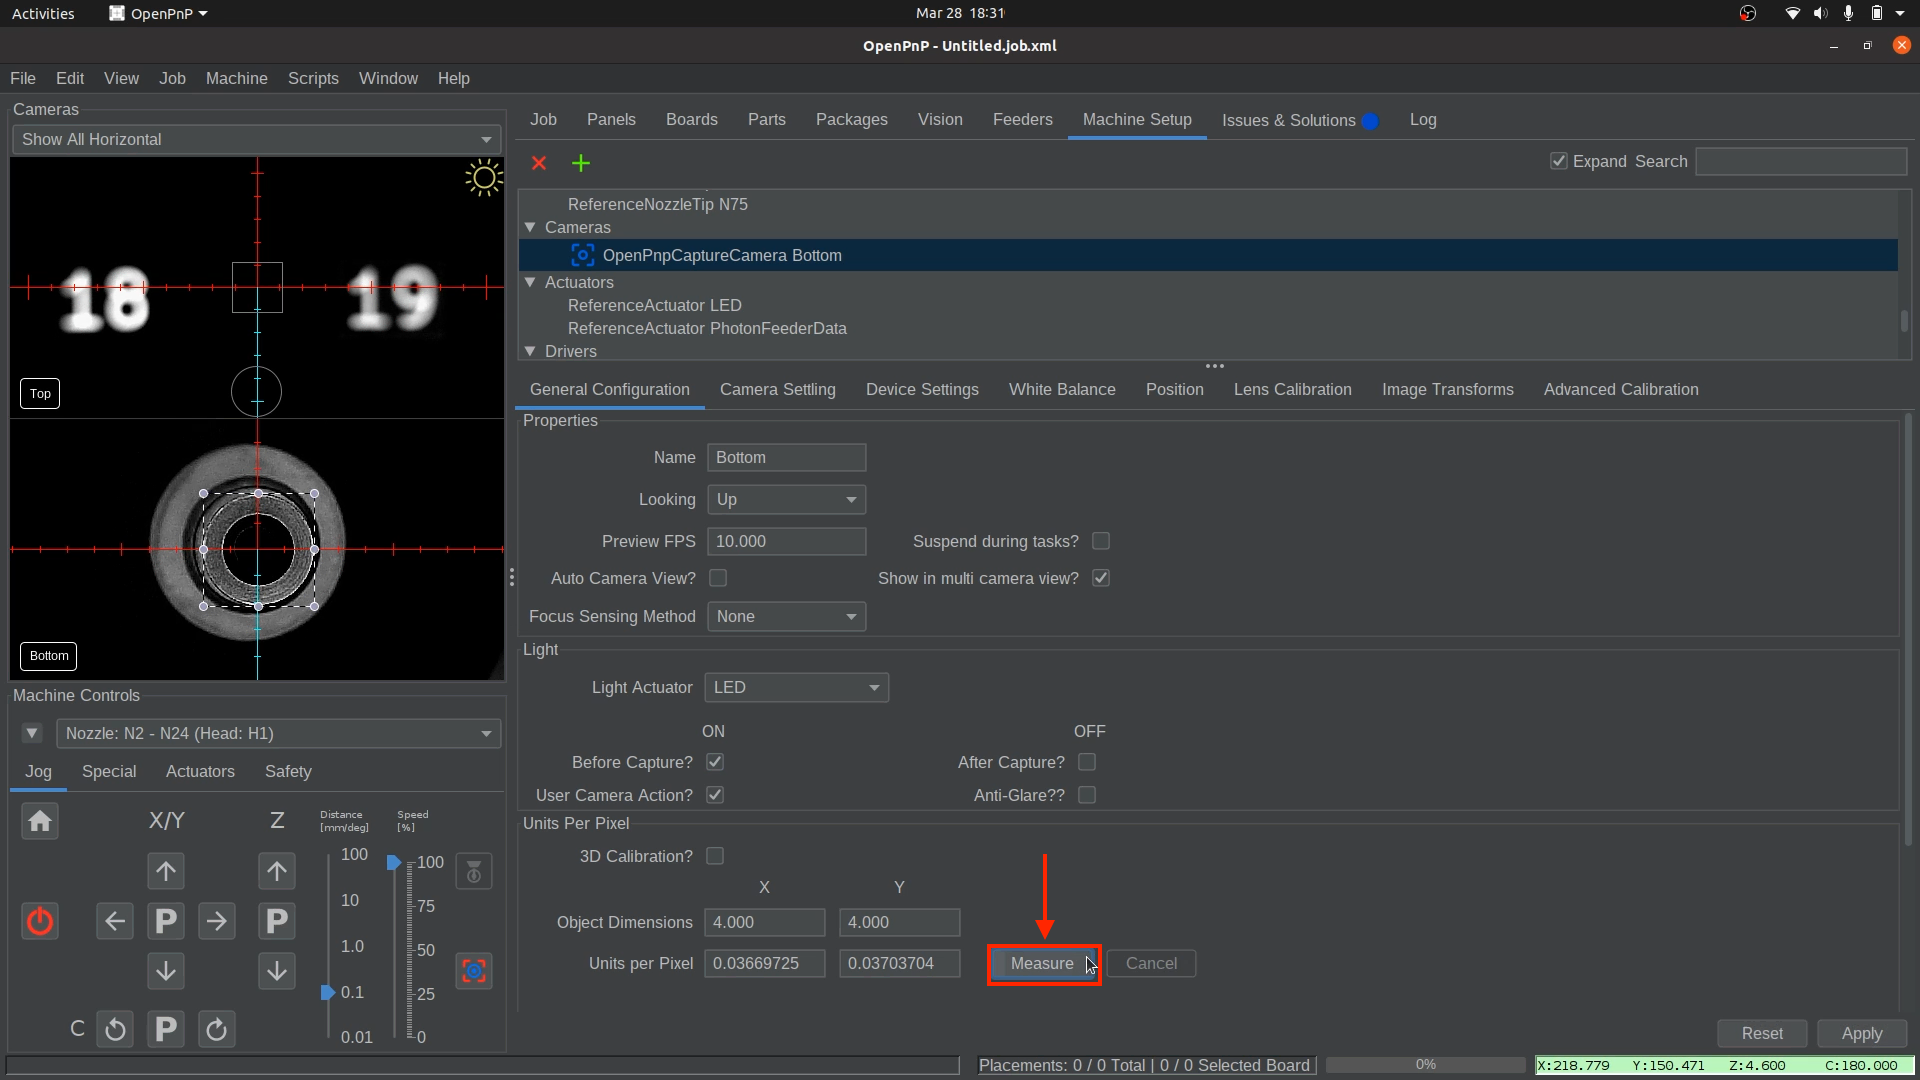
- Click
Applyin the lower right corner to save your changes.
- Save your OpenPnP configuration now.
File > Save Configuration.
- Once you have it perfectly outlined, click the
Validate Bottom Camera MM/Pixel Calibration
Lets verify the bottom camera calibration was successful. This will ensure the bottom camera's millimeter per pixel is accurate so it is moving the correct amount for a given command.
-
Ensure your bottom camera view is fully zoomed out.
- Hover over the top camera's feed, and scroll with the mouse wheel or trackpad to zoom all the way out.
-
Confirm bottom camera is calibrated correctly.
- Click and drag the center reticle (located in the middle of the camera feed) to the edge of the nozzle tip and then back to the center of the tip.
- The Bottom Camera should now be centered on the nozzle tip again.
- If it's inaccurate, repeat the bottom camera calibration and confirm you are using the larger N24 nozzle tip on Nozzle: N2 (right toolhead).
Next Steps
Next is Nozzle Offset Calibration.