Connecting to Your LumenPnP V3 and Configure Bottom Camera
![]()
(V2 Users, you can use these docs for your machine as well. For anything specific to V2, we will add notes pointing it out).
Now that OpenPnP is installed and the LumenPnP configuration files have been placed in the hidden system folder, OpenPnP can start with some basic preconfigured settings. The next step is to connect your LumenPnP and get familiar with OpenPnP’s user interface..
Then, we will install the N045 and N24 nozzle tips to help us with calibration.
Finally, we will configure your bottom camera by establishing a connection to it, and setting the correct exposure.
Prepare for Connection
Before launching OpenPnP, follow these guidelines to ensure a smooth connection:
USB Connection Order Matters!
Always plug in your LumenPnP’s USB cable before launching OpenPnP.
If OpenPnP is already open, close it before connecting the USB.
Camera USB Ports
Plug cameras directly into your computer using separate USB ports.
Avoid USB hubs, as they may not provide enough bandwidth for the cameras.Use separate USB ports directly into your computer. The cameras require a lot of USB bandwidth, and many USB hubs aren't capable of handling it. For best results, make sure each camera is plugged into a different USB port directly into your computer, ideally on different internal USB hubs.
Connecting to Your LumenPnP V3
Follow these steps in order:
Always Plug In Barrel Jack First
Always plug in the barrel jack before USB power. This ensures the proper power up sequence for the LumenPnP motherboard. When plugging in the barrel jack, always make sure the USB type B connector is unplugged.
-
Ensure OpenPnP is closed.
-
Power the LumenPnP by plugging in the barrel jack power cable.
-
Connect the LumenPnP to your computer using the included USB cable.
-
Connect both cameras using their USB cables.
-
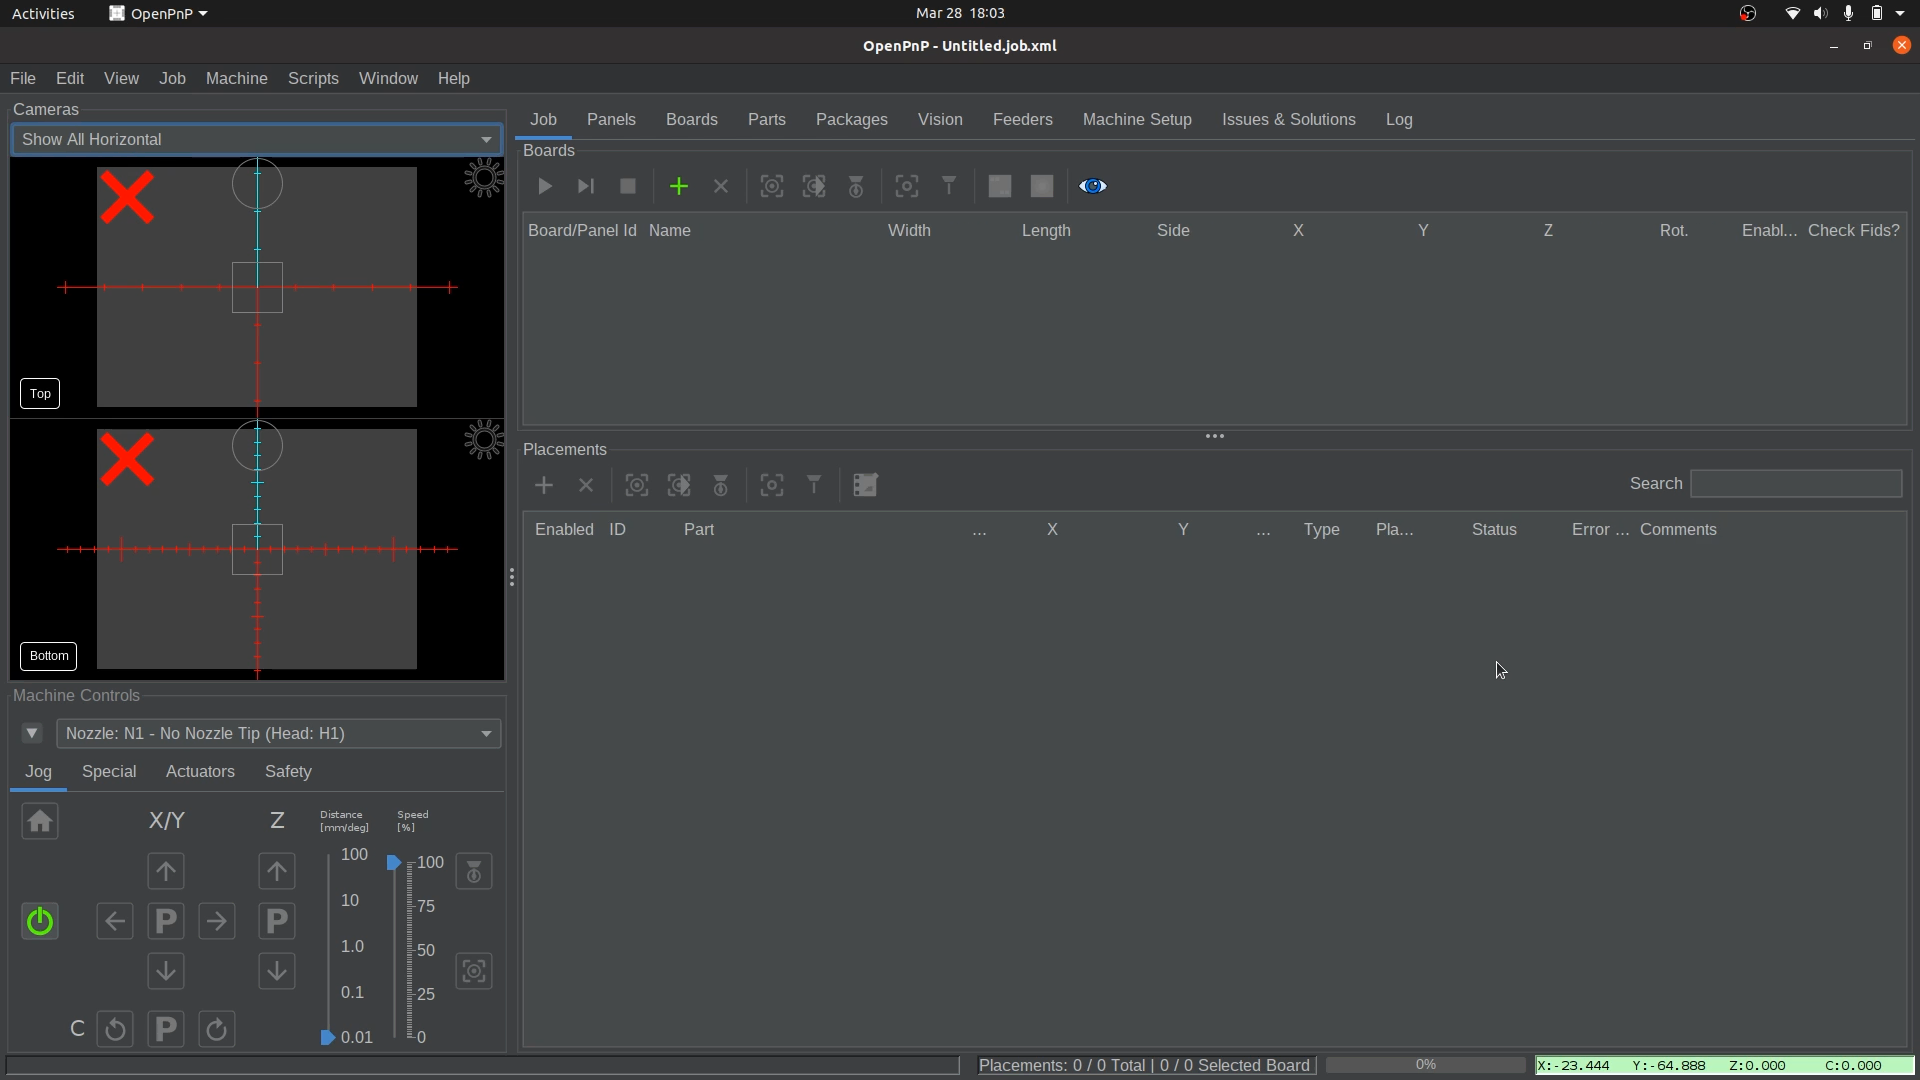
Launch OpenPnP. You should now see the OpenPnP user interface:
Configuration the Serial Port
Before OpenPnP can communicate with the LumenPnP, we need to set the correct serial port.
-
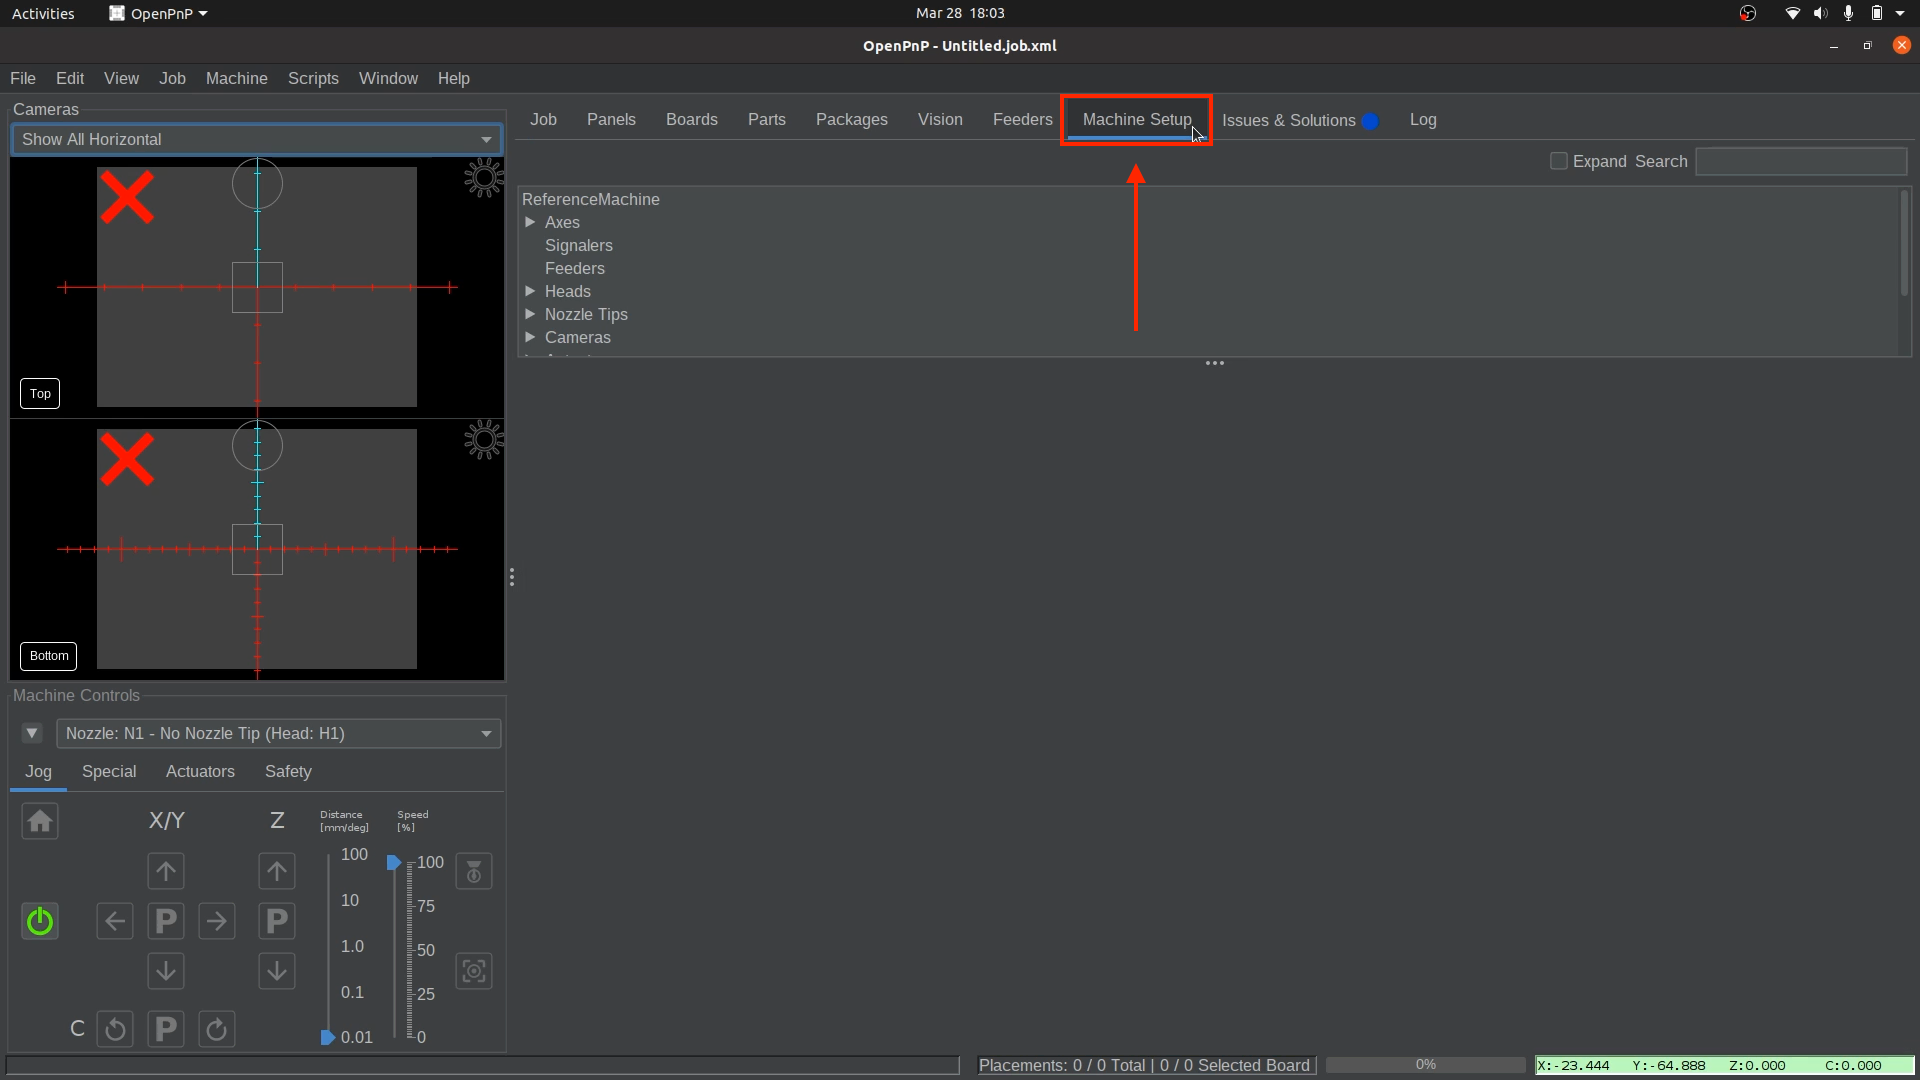
Open Machine Setup
- Click the
Machine Setuptab, toward the top right section of OpenPnP.
- Click the
-
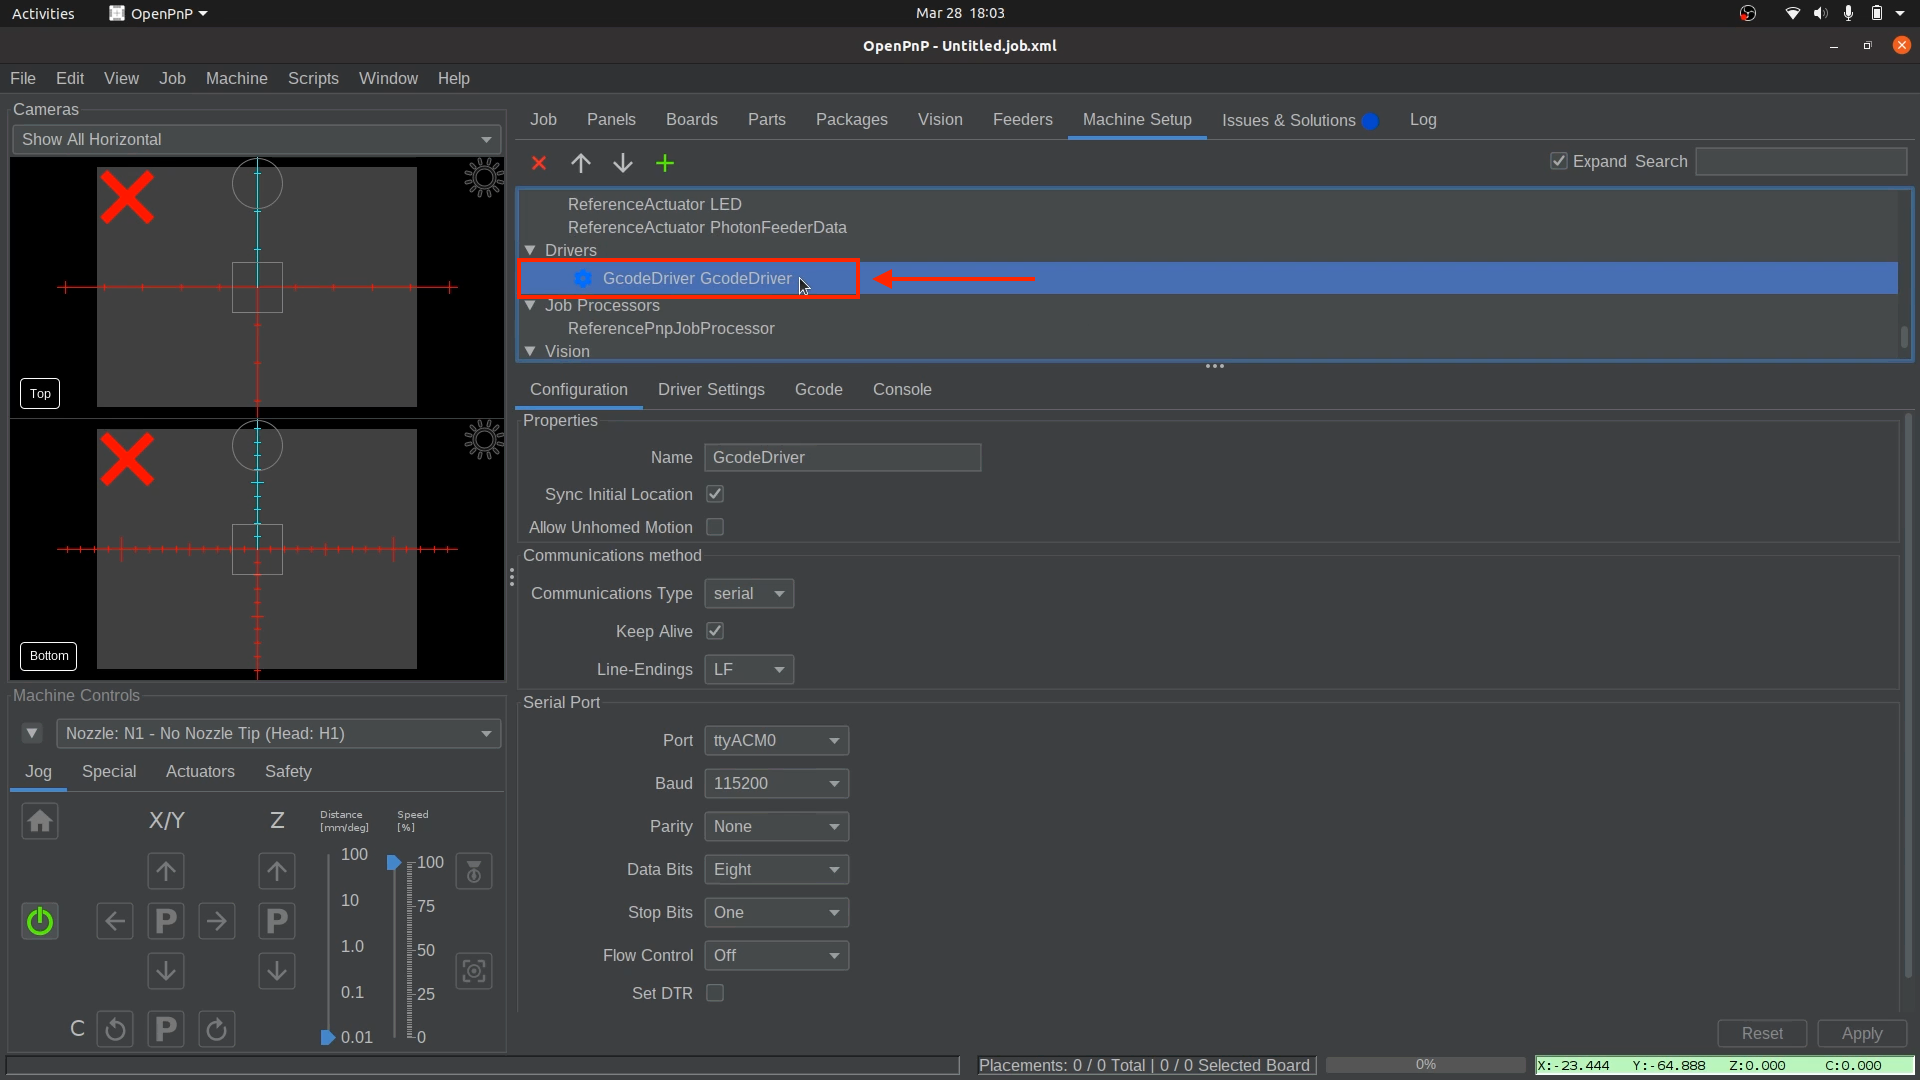
Expand the Configuration Trees
- Check the
Expandcheckbox toward the top right of OpenPnP to show all machine configuration options. - This will expand all of the categories, and sub-categories, in the upper pane of
Machine Setupand will require you to scroll to see all of the options mentioned below.

- Check the
-
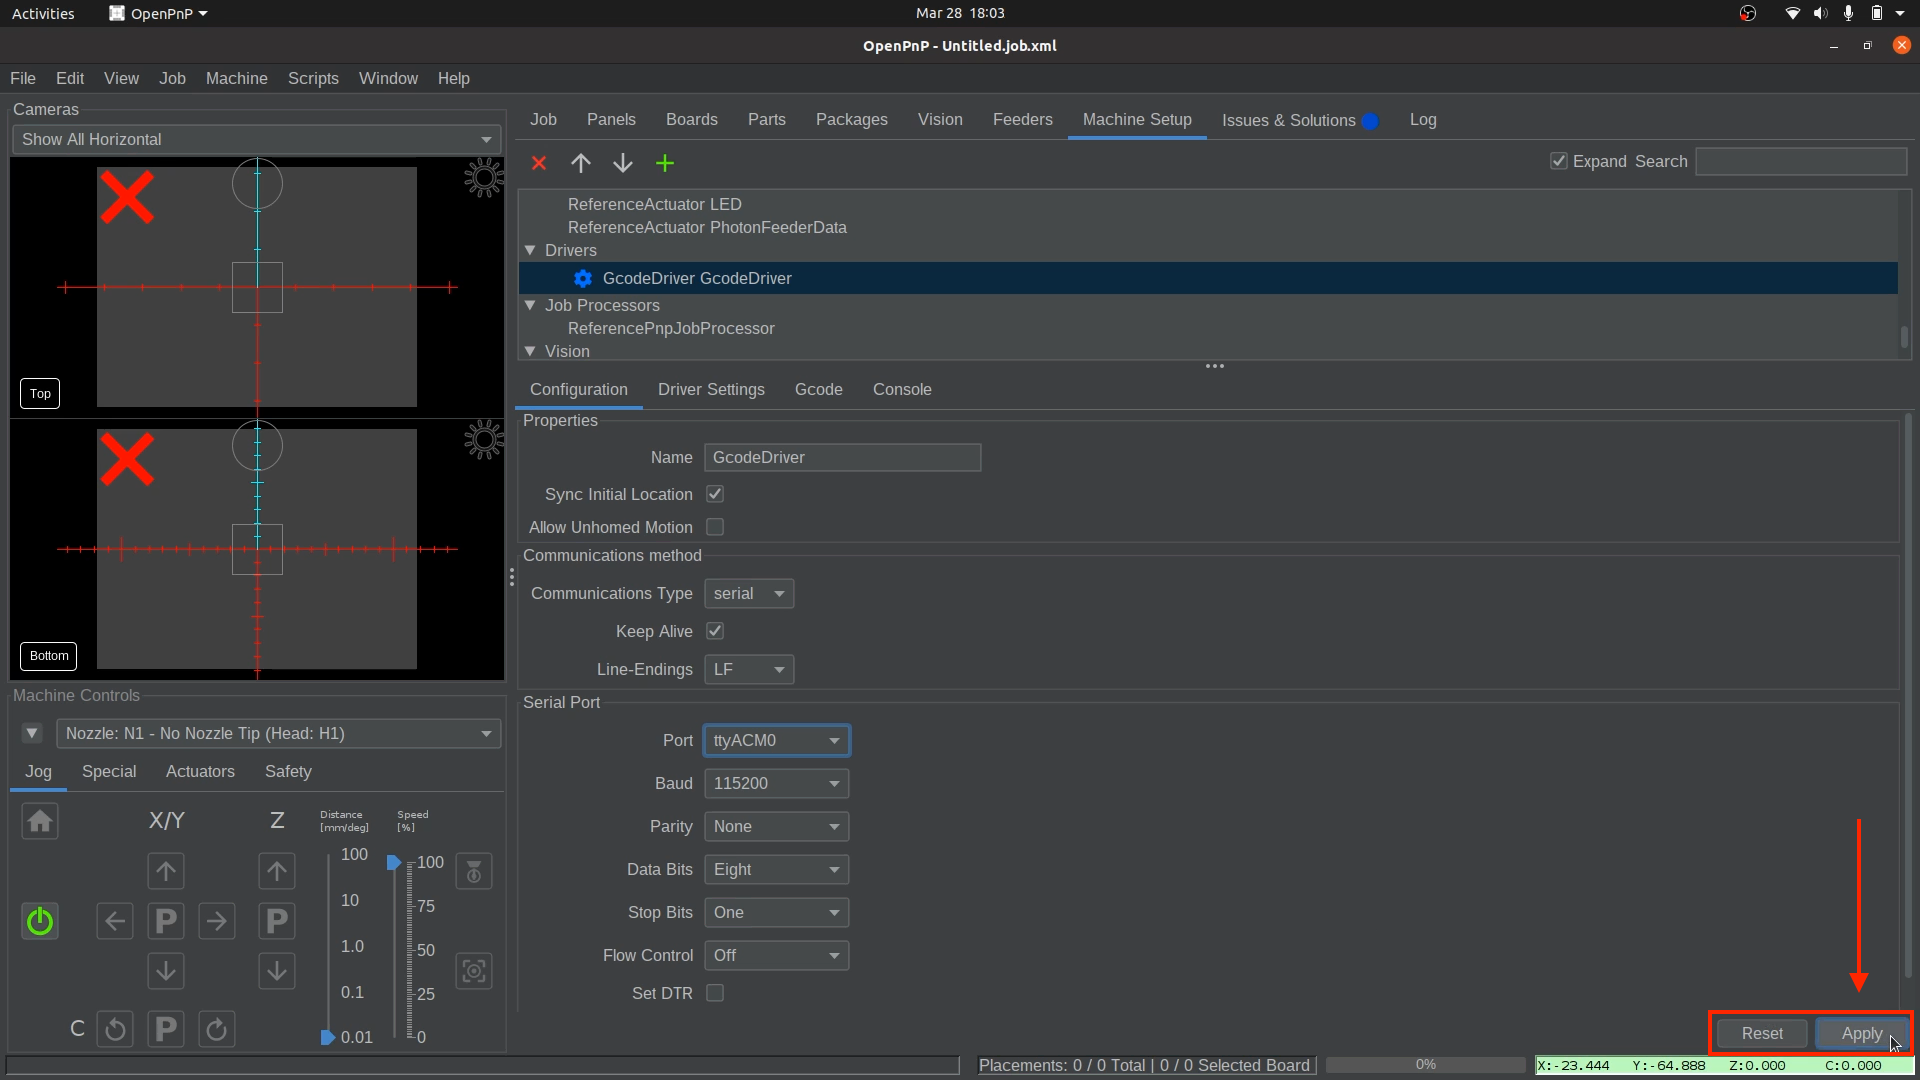
Select the Gcode Driver
- In the upper pane, locate the newly expanded
Driverscategory and click onGcodeDriver GcodeDriver.
- In the upper pane, locate the newly expanded
-
Choose the Correct Port
- Under the
Serial Portsection in theConfigurationtab, select the correctPortfrom the dropdown menu:- Linux: Select the
Portformatted asttyACM#. (Examples ttyACM0, ttyACM1, ttyACM2, etc.)
- Windows: The
Portwill be labeled asCOM#. (Examples COM1, COM2, COM3, etc.) - Mac: Look for a
Portin the format ofcu.usbmodemXXXX, whereXXXXis a series of numbers.
- Linux: Select the
- Under the
-
Apply and Save
- Click
Applyin the lower right corner to save your changes.
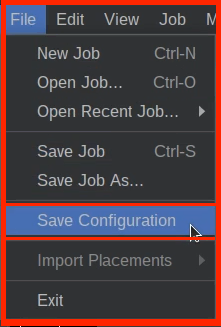
- Save your OpenPnP configuration:
File > Save Configuration.

- Click
Port Not Found?
If your machine's port isn't listed:
-
Ensure the USB cable is securely connected on both sides.
-
Make sure the motherboard is powered on.
-
Close OpenPnP, press the reset button on the control box, wait a few seconds, and reopen OpenPnP.
-
Finally, use our Debug Tool and see if you are able to connect your LumenPnP there.
Establishing a Serial Connection
-
Connect OpenPnP to Your Machine
- Click the green power button in the
Machine Controlssection (Bottom left of OpenPnP).
- Click the green power button in the
-
Confirm Connection
- If successful, the green power button will turn red. This means OpenPnP has successfully connected to your machine.
- If unsuccessful,review your Serial Port Connection.
- If successful, the green power button will turn red. This means OpenPnP has successfully connected to your machine.
-
Turn On Ring Lights
- In the bottom left corner of OpenPnP, go to
Machine Controls. - Click the
Actuatorstab. - Click the
LEDbutton. - Then press
On.
- Close the LED window.
- Switch back to the
Jogtab so you are ready to move the nozzles in the following steps.
Keep Ring Lights On
Keep the ring lights on for the rest of calibration. All calibrations should be based on the lighting from the ring lights. Once calibration is complete and running a job on the LumenPnP, OpenPnP will automatically control the ring lights as needed, eliminating the need for manual operation during normal use.
- In the bottom left corner of OpenPnP, go to
Preparing for Homing
-
Level the nozzles before homing.
🚨 Critical Warning: Level Nozzles Before Homing 🚨
Before pressing the homing button—now and every time in the future—you must ensure that your nozzles are level.
⚠️ Failure to do this can cause crashes and potentially damage your machine.
OpenPnP does not remember the previous nozzle positions from the last homing sequence, meaning it cannot adjust movements based on past alignment. If the nozzles are not level before homing, they may collide with the machine, leading to misalignment or serious hardware damage.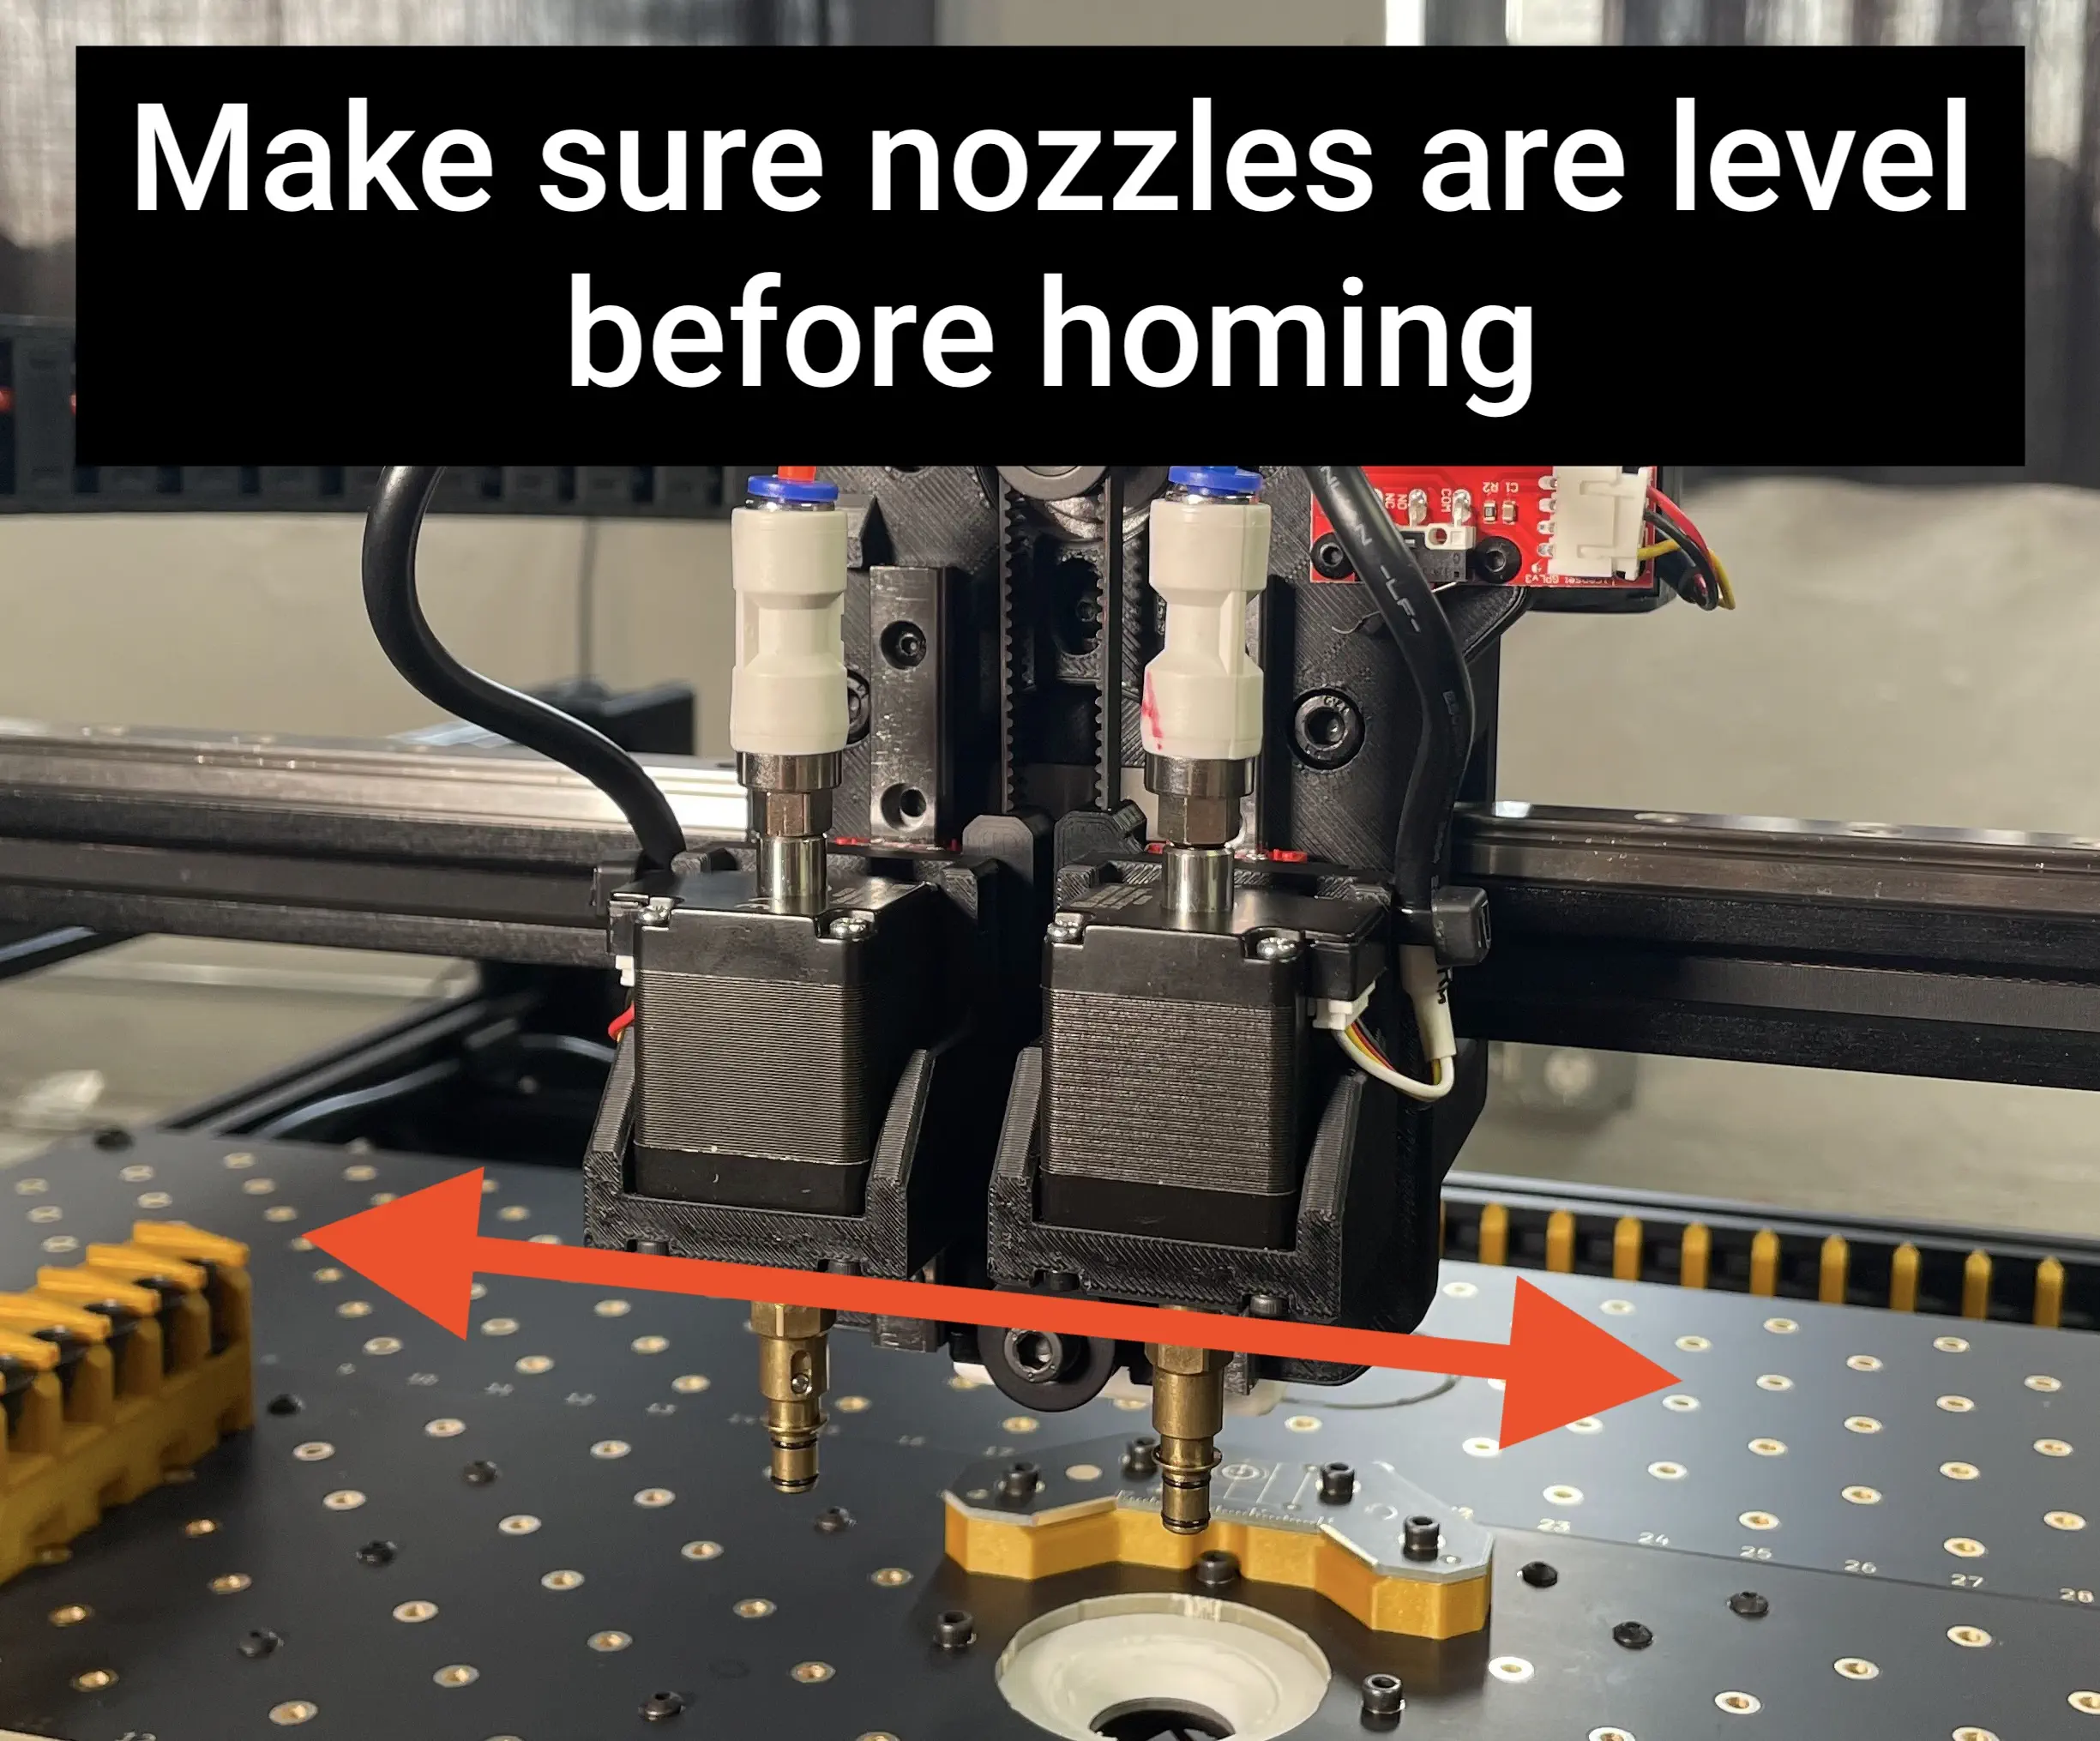
Note
Use the
Pbetween the Z-axis up/down arrows located in Machine Controls toward the bottom right of OpenPnP. This ensures the nozzle tips are out of the way.Pstands for Parking the nozzle out of the way into a safe height that won’t collide with any objects. If nothing happens after you click thePbutton, that means the nozzles are at a safe height already.Nozzles not level after parking.
The nozzles may not be level when clicking the “Park” button, which is okay. The nozzle only moves to the point that it reaches the “safe zone” and then stops.
-
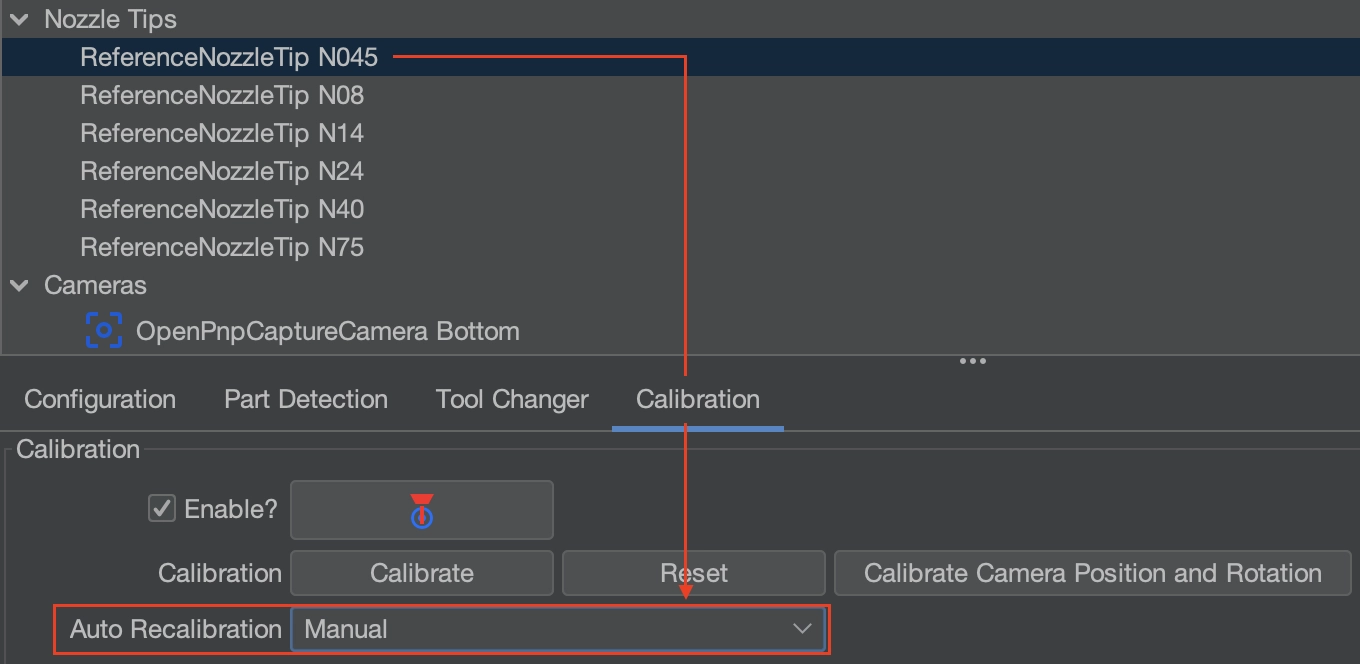
Before we home the LumenPnP, it is very important that we check a couple of settings.
- Go to
Machine Setup > Nozzle Tips >N045 > Calibration Tab > Auto Recalibration - Ensure
Auto Recalibrationis set toManual.
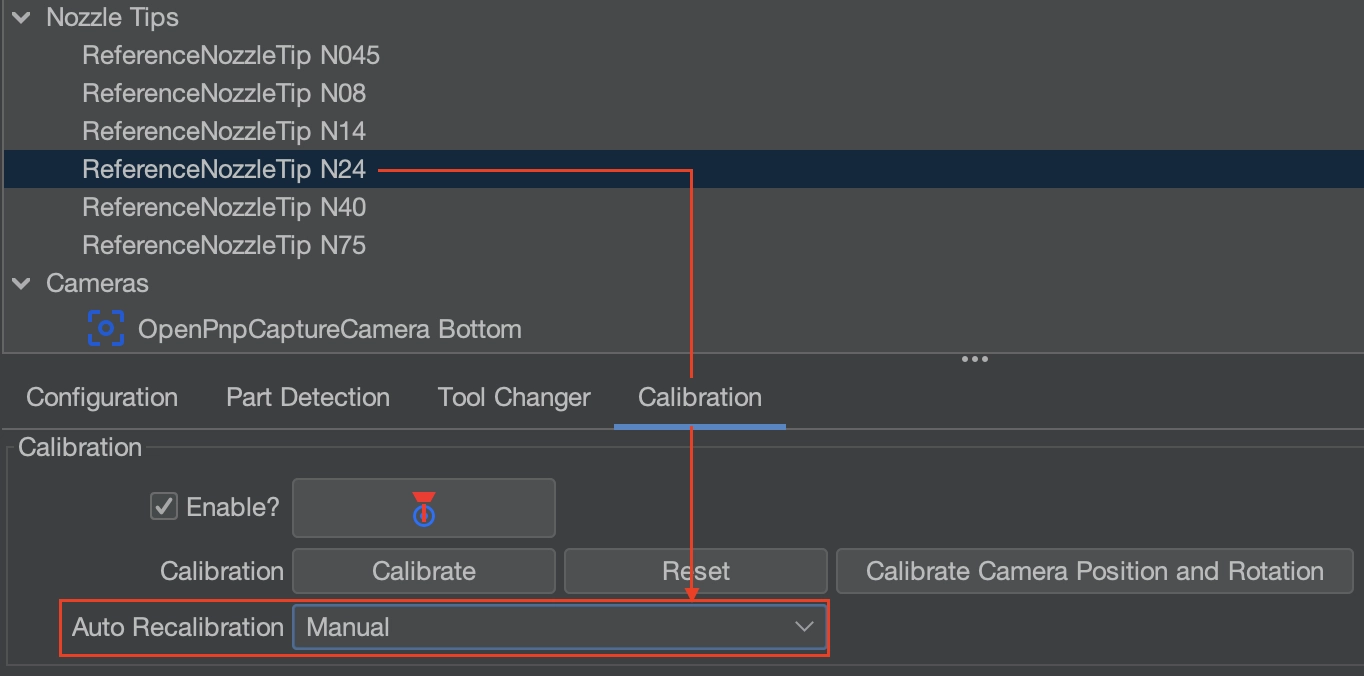
- Then, go to
Machine Setup > Nozzle Tips >N24 > Calibration Tab > Auto Recalibration - Ensure
Auto Recalibrationis set toManual.
- Go to
-
Once the nozzle tips are set to
Manual, click the Home button to perform a rough homing sequence.- The Nozzles will move to X, Y, and Z zero positions (front-left corner of the LumenPnP) and park there.
- If the LumenPnP does not stay in the front left corner of the machine, Please go back to the prior step and ensure the
Manualsettings was saved.
 This image shows a V4 homing, but the end location is the same for both versions.
If your machine does not move fully to the front left
If your LumenPnP does not move all the way to the front left of the machine when you click the Home icon, it could mean that your sensorless homing values need to be adjusted.
Instructions for tuning this setting are here.
Install the Nozzle Tips
-
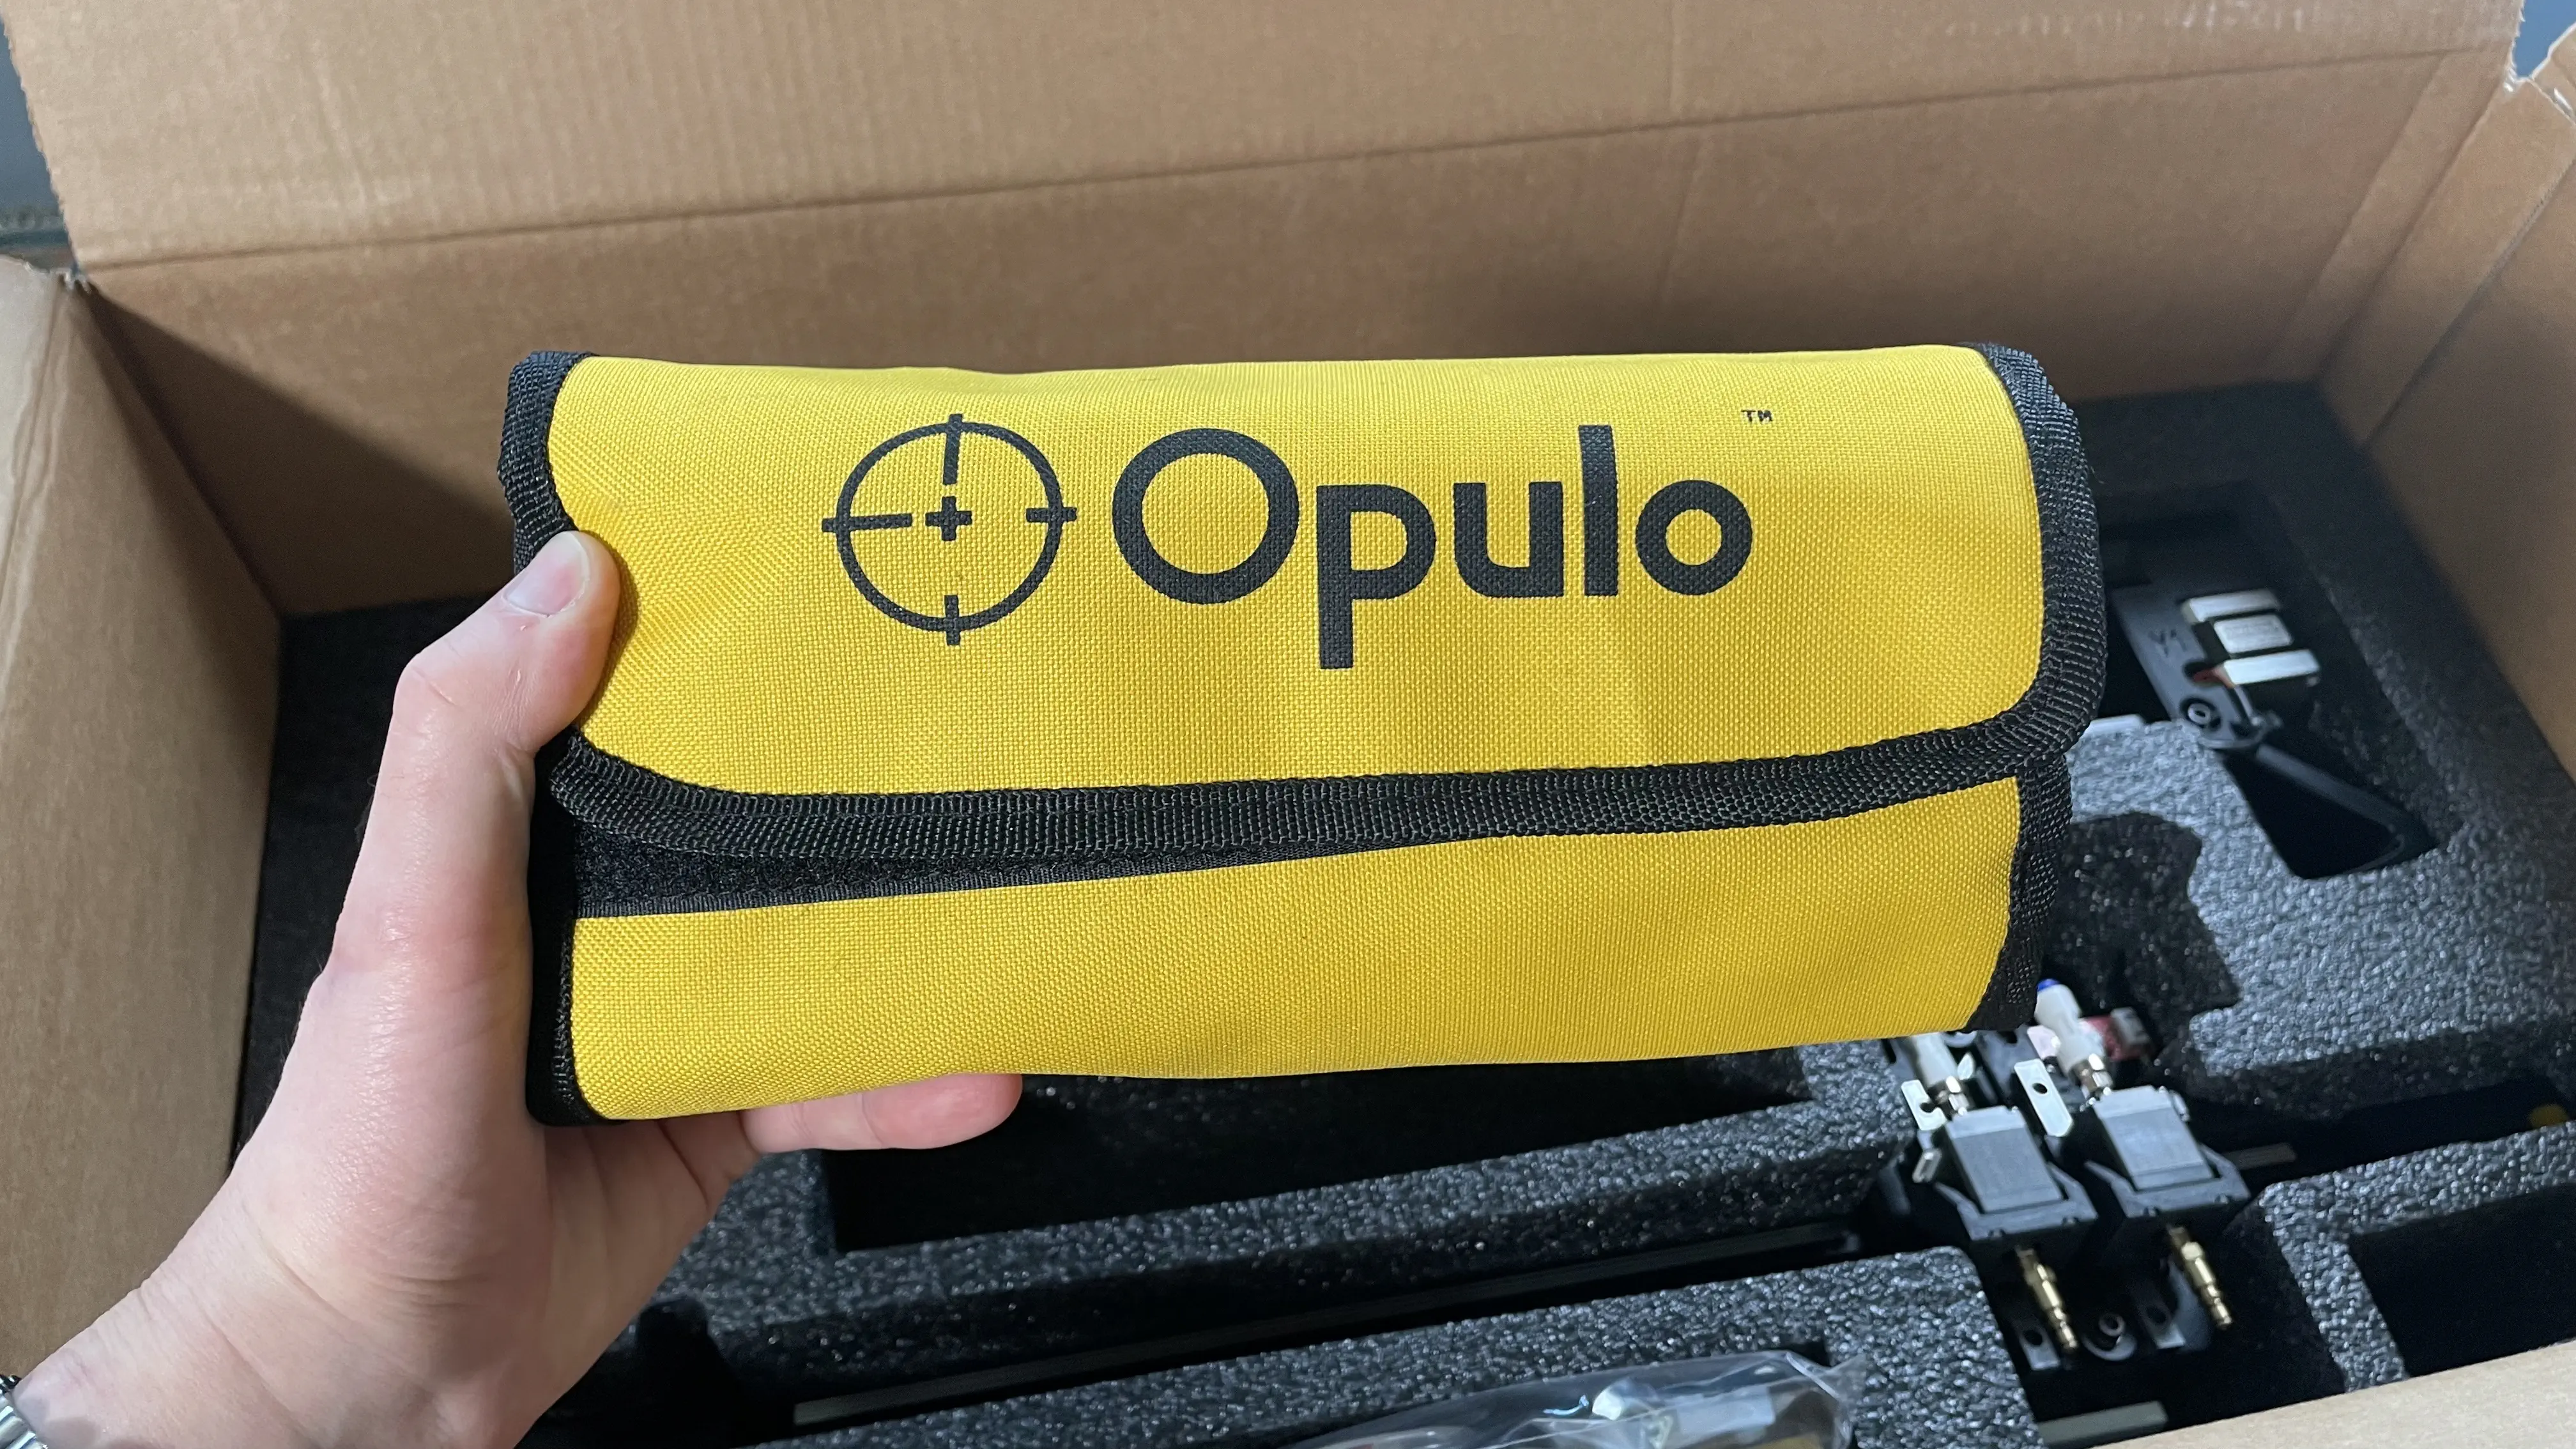
Locate Your Nozzle Tips and SuperLube tube.
- Find and remove the
N045andN24nozzle tips in the nozzle rack that is mounted on the staging plate.

- Remove the
SuperLubeTube that comes in the LumenPnP V3 Tool Bag.
- Find and remove the
-
Lubricate both brass nozzles.
- Apply a small amount of SuperLube to the brass nozzles. This prevents damage to the rubber O-rings when mounting nozzle tips. We pre-lubricate them before shipping, but adding extra ensures longevity.

Automatic Nozzle Tip Swapping
OpenPnP supports automatic nozzle tip swapping, but we don’t recommend it yet due to inconsistent performance. This feature will be improved in a future update, and the nozzle tip rack will be mounted on the staging plate. Most jobs can be completed using an
N045on one nozzle and anN24on the other. - Apply a small amount of SuperLube to the brass nozzles. This prevents damage to the rubber O-rings when mounting nozzle tips. We pre-lubricate them before shipping, but adding extra ensures longevity.
-
Mount the
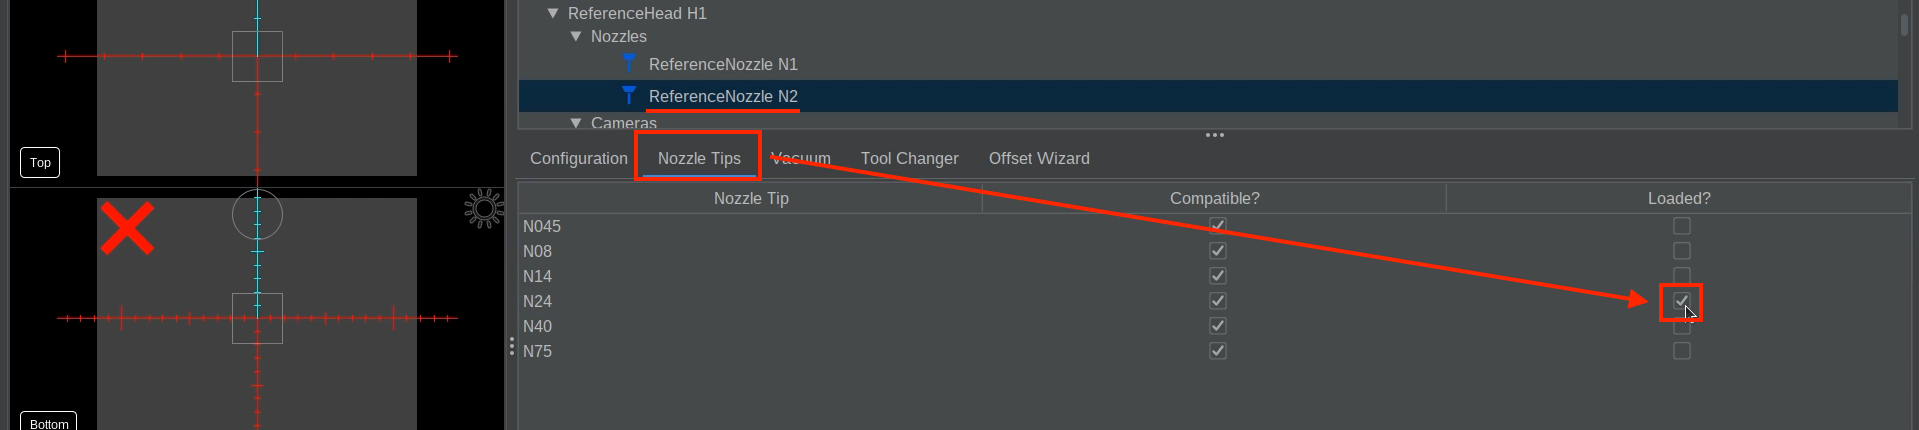
N045Nozzle Tip onto Nozzle: N1.- In OpenPnP, navigate to
Machine Setup > Heads > ReferenceHead H1 > Nozzles > ReferenceNozzle N1. - Select the
Nozzle Tipstab, and check theLoaded?checkbox for theN045row. - Your machine will jog the head to the front of the machine for easy tip loading.

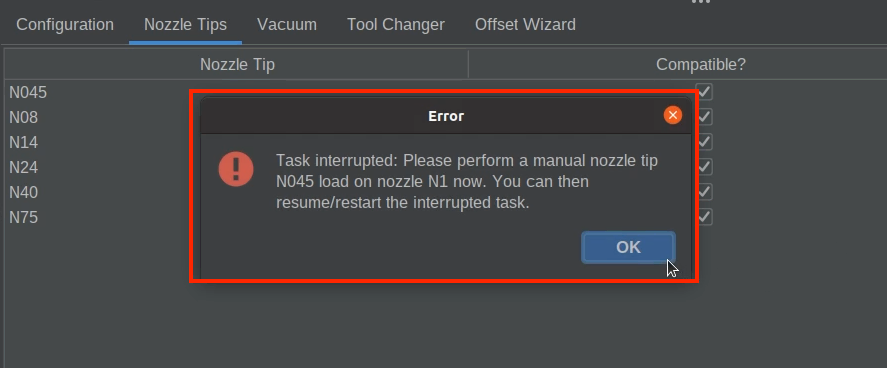
- A ”Task Interrupted:” window will pop up. This is not an error! OpenPnP is just notifying you that the job has been stopped if one is running. This is normal and can be dismissed.
- Slide the N045 nozzle tip (the one with the smaller opening) onto the left nozzle (using red tubing). Rotate the nozzle tip as you mount it to the brass nozzle to evenly distribute the lubricant around the O-rings. It should slide on and off smoothly after working it in.

- In OpenPnP, navigate to
-
Mount the
N24Nozzle Tip onto Nozzle: N2.- In OpenPnP, navigate to
Machine Setup > Heads > ReferenceHead H1 > Nozzles > ReferenceNozzle N2. - Select the
Nozzle Tipstab, and check theLoaded?checkbox for theN24row. - Don’t forget. It will move to the second nozzle and you’ll see the ”Task Interrupted:” popup window again.
- Slide the N24 nozzle tip (the one with the larger opening) onto the right nozzle (using blue tubing). Rotate the nozzle tip as you mount it to the brass holder to ensure the grease works its way into the tip and around the O-rings. It should slide on and off easily after working it in.

Why These Nozzle Tips?
The N045 and N24 nozzle tips cover the vast majority of parts without needing swaps. We highly recommend keeping them as the default and only swapping when absolutely (e.g., for very heavy parts).
- In OpenPnP, navigate to
Configuring the Bottom Camera
Before calibration begins, the bottom camera and exposure must be set up properly. We will need to install a nozzle tip and position it above the bottom camera to properly adjust the exposure.
Which Reticle should I use?
We use the "Ruler" Reticle in the following steps. If you prefer to use the same reticle style that we use, right-click on the top or bottom camera feed and choose Reticle, then "Ruler" to match our docs photos best.

Note
From the LumenPnP V3 and up, machines ship with a more recessed bottom camera, as ween in the photo below. The images in our setup guides mostly show an older mounting solution, but either works the same.

-
🚨 Remove Lens Caps 🚨
- ⚠️ Ensure both the top and bottom cameras have their lens caps removed.

- ⚠️ Ensure both the top and bottom cameras have their lens caps removed.
-
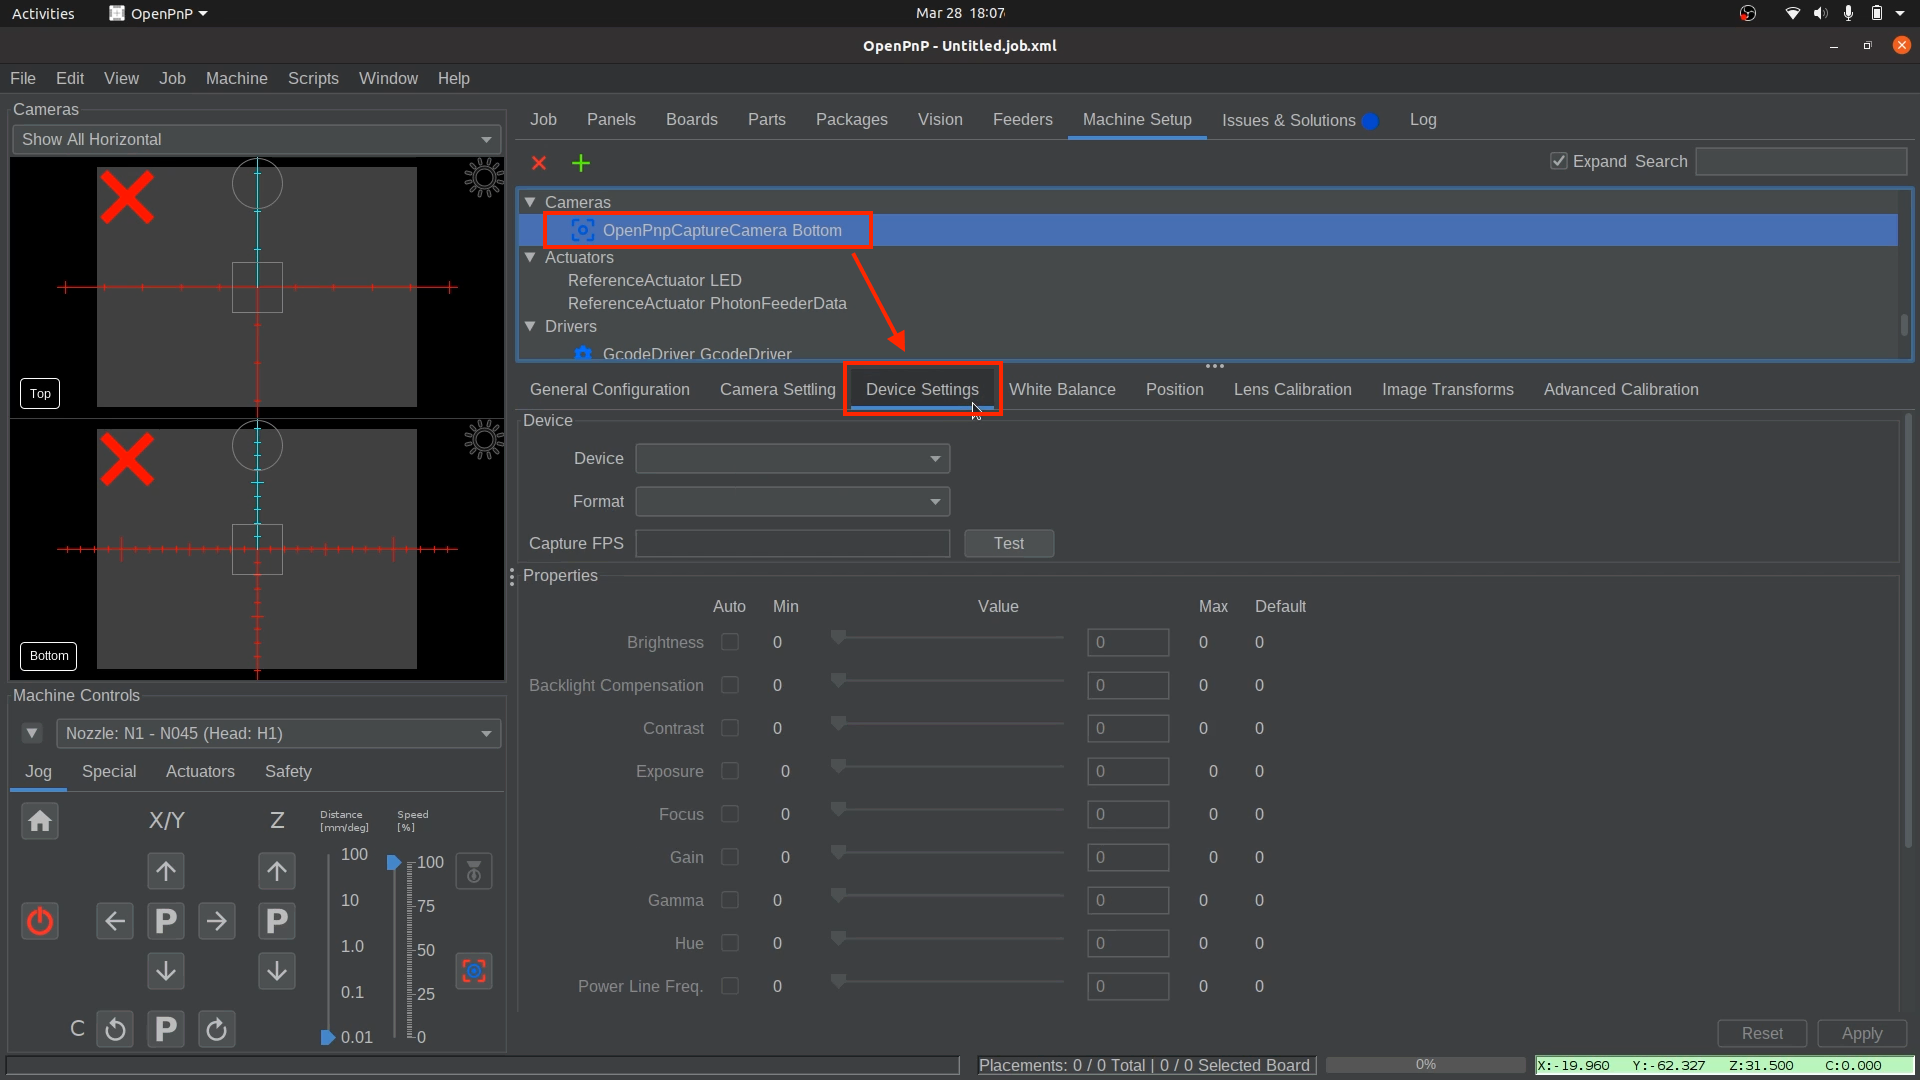
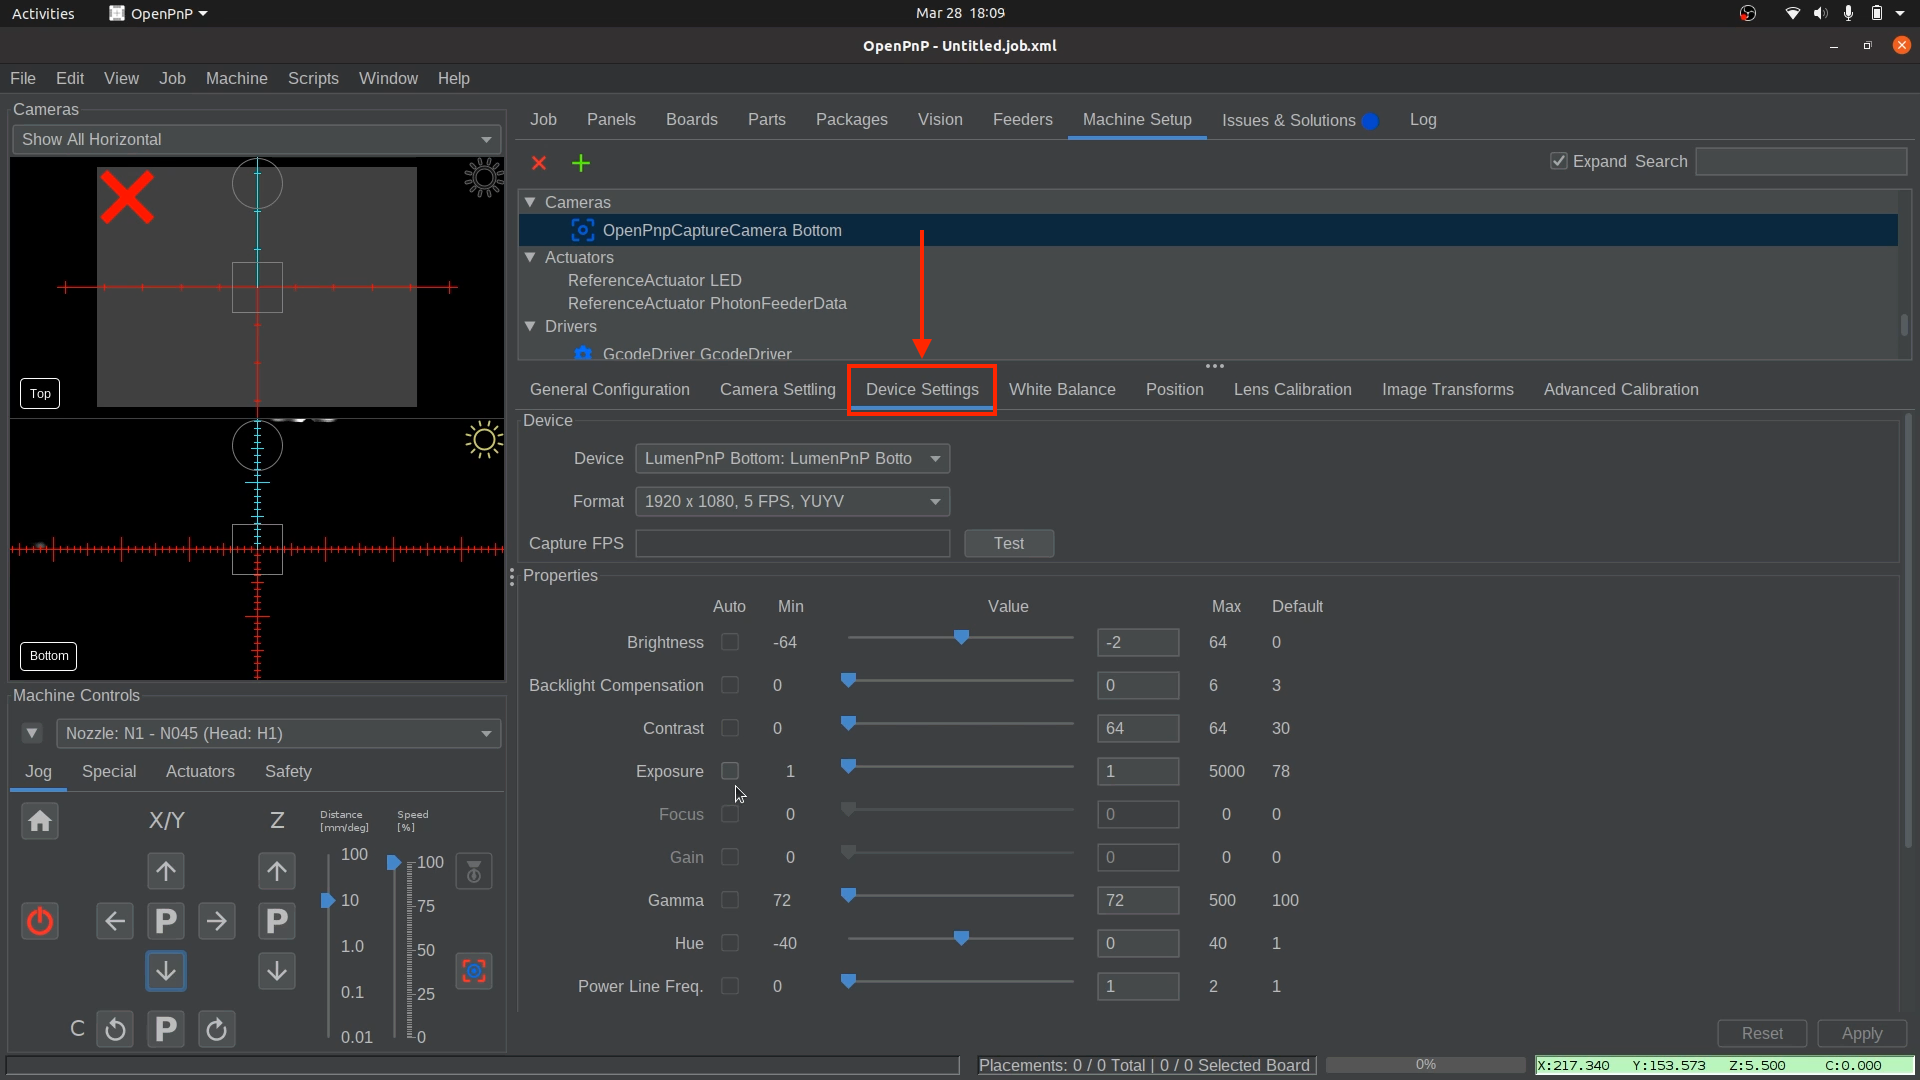
Navigate to the Bottom Camera's Device Settings tab in OpenPnP
- Navigate to
Machine Setup > Cameras > OpenPnpCaptureCamera Bottom > Device Settings tab.
- Navigate to
-
Choose the Correct Camera Device
- In the
Device Settingstab, selectLumenPnP Bottomfrom theDevicedropdown.
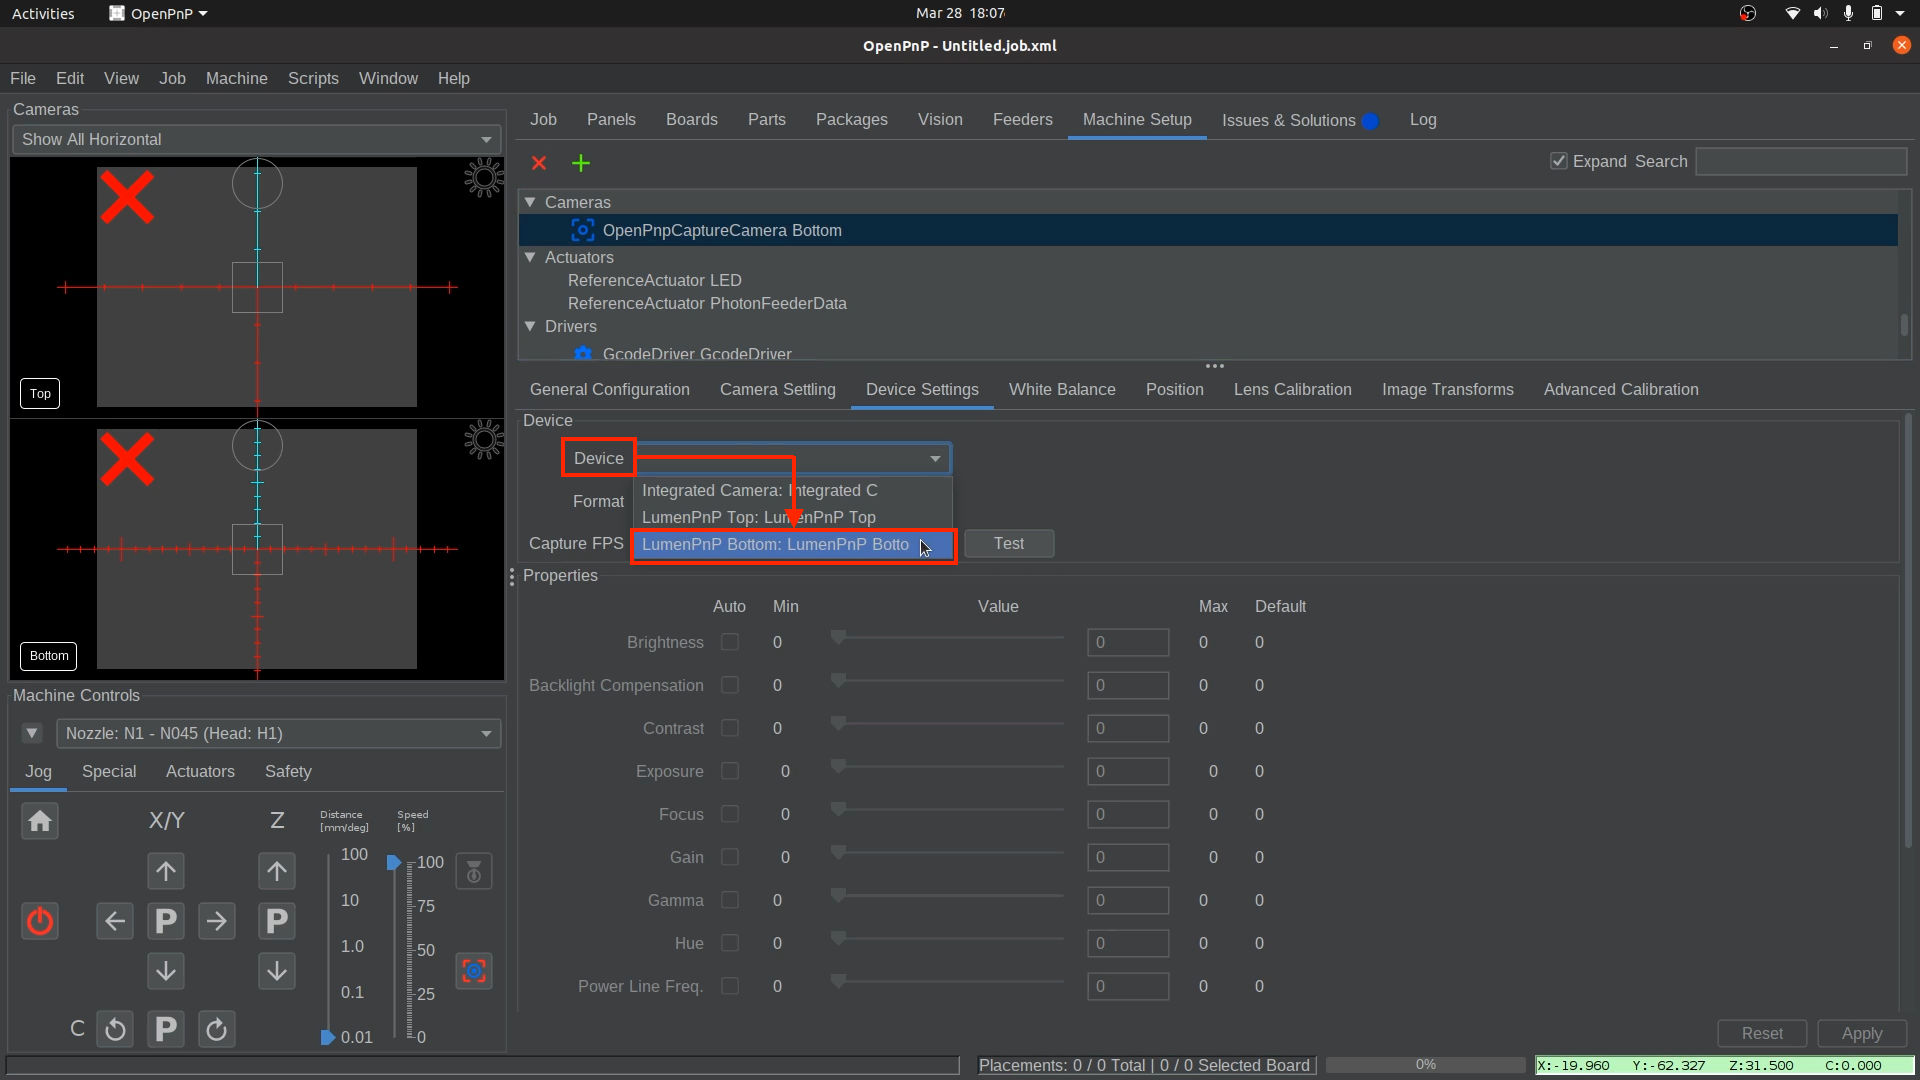
Duplicate Camera Names
If two cameras appear with the same name, select one. If incorrect, choose the other. This is a bug within OpenPnP.
- In the
-
Set Resolution and Frame Rate
- In the
Formatdrop-down menu, select1280x720, 10FPS. A low frame rate is crucial to avoid bandwidth/performance issues.

- In the
-
Apply and Verify
- Click
Applyto save the Bottom Camera settings. One of the red "X"s in the camera feed should disappear. The image might be entirely black, but we'll fix that in the following steps. - Save your OpenPnP configuration so OpenPnP will remember this when opened.
File > Save Configuration.
- Click
Adjust Bottom Camera Exposure
Other Camera Settings
In the following step, do not modify any camera settings other than exposure. The default values should remain unchanged.
-
Select Nozzle: N1.
- From the
Machine Controlsdropdown, selectNozzle: N1 - N045 (Head:H1).
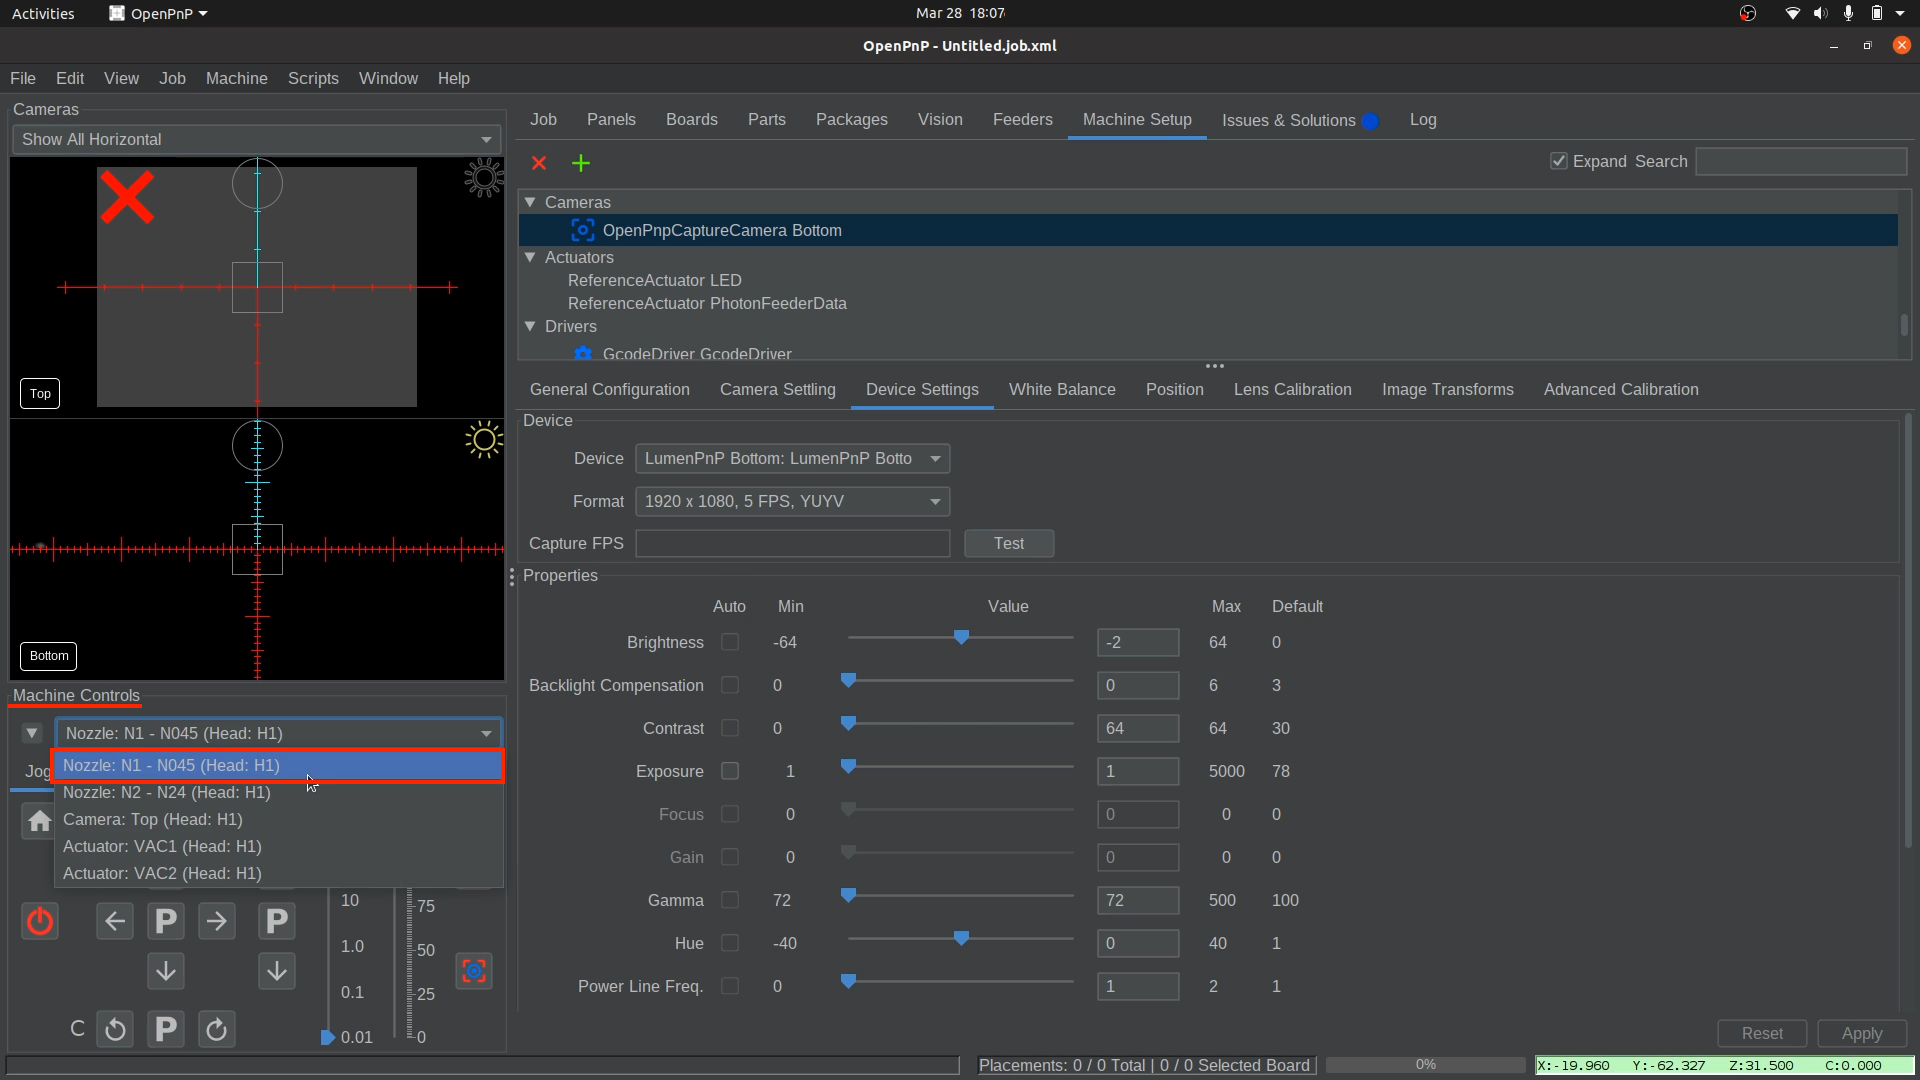
- From the
-
Select the bottom Camera.
- Navigate to
Machine Setup > Cameras > OpenPnPCaptureCamera Bottom
- Navigate to
-
Access the Position Tab.
- Click on the
Positiontab. - Enter
31.500into theZ position field. (This step is specific to any LumenPnP V3 machine, and is vital that it is set to 31.5.)

- Click on the
-
Save the 31.500 Z Position
- Click
Applyin the lower right corner to save the bottom camera position in OpenPnP.
- Click
-
Align Nozzle Tip Over the Bottom Camera.
- In the
Position Tab, click on the button to bring the nozzle tip over the bottom camera. This will jog the Nozzle: N1 (left toolhead) to be roughly over the bottom camera.

- In the
-
Adjust the bottom camera exposure using the slider.
- Return to
Machine Setup > Cameras > OpenPnpCaptureCamera Bottomto adjust the exposure. This will help us through the rest of the calibration. - 🚨 Keep all other camera settings at their default value, and only adjust the exposure slider.
- In the
OpenPnpCaptureCamera Bottomgo back to theDevice Settingstab.
- Located the
Exposureslider and click on the check box labeledAuto. The camera will attempt to find the correct exposure. - Then, uncheck the
Autobox to ensure we are now in "manual adjustment" mode.
- Using the jog controls, fine-tune the nozzle tip location to be perfectly centered over the bottom camera's reticle. You can use your mouse scroll wheel to zoom in on the feed for more precision. (Images are of a LumenPnP V4 and won't match exactly what you will see)
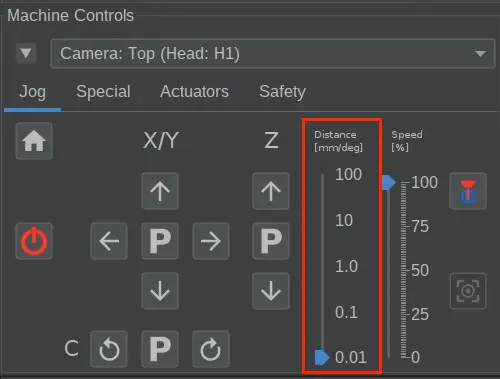
- Set the
Distanceslider to0.1or0.01for when you need more precise movements.
- Right click on the bottom camera's feed and select
Show Image Info?to enable the image info card. This will give you the brightness histogram of the image.
- Use the histogram as a general guide rather than a precise measurement. It’s a helpful tool but not exact. For the best results, refer to the comparison photos below, which show examples of 'too bright,' 'too dark,' and 'good exposure' to help you fine-tune your settings after using the histogram.
- In the next step, we'll be aiming for a sharp peak on the right side and a larger cluster to the left in the histogram. See the image below for reference.
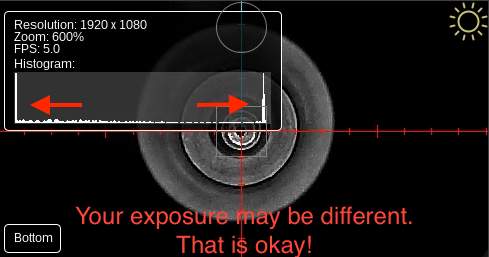
🚨 Important 🚨
The reference image above is just an example. Your histogram may look very different depending on lighting conditions, camera placement, and other environmental factors. Do not try to match it exactly. Instead, focus on achieving the key characteristics: a distinct peak on the right and a noticeable cluster, or peak, to the left. Adjust gradually until the image is clear and well-exposed.
- Return to
-
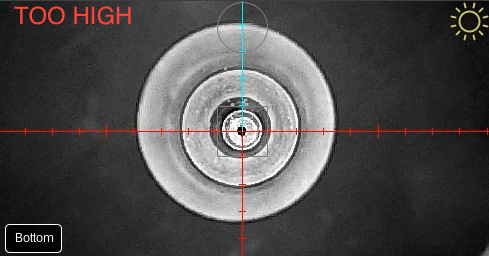
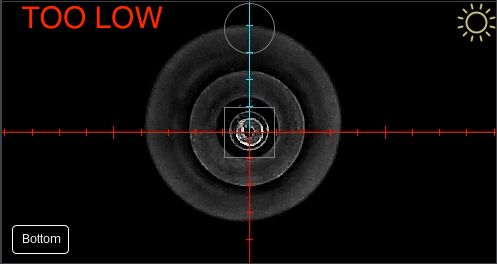
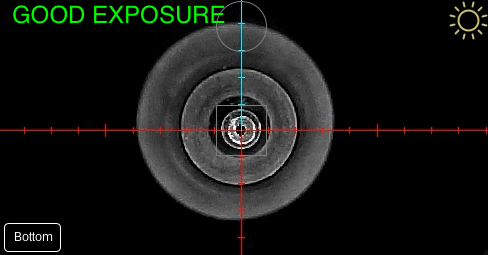
Find the Correct Exposure.
- Adjust the exposure slider, or enter varying manual exposure values, to ensure the camera can clearly detect the dark hole in the nozzle tip for calibration. The exposure should be balanced. Meaning, sbright enough to distinguish the nozzle tip from the background but not so bright that the hole becomes difficult to detect. Aim for a setting where the brightest areas are visible but do not appear completely white, and the darker areas remain well-defined. Use the following images as a reference for adjusting exposure:
- Close the Histogram window when you are done with it.
Not seeing anything in the bottom camera feed?
If you are not seeing anything after adjusting the bottom camera exposure, ensure the lens caps on the bottom camera has been removed.
For Mac Users
On some Macs, If OpenPnP doesn’t allow exposure adjustments, use the open-source tool, CameraController.
- Adjust the exposure slider, or enter varying manual exposure values, to ensure the camera can clearly detect the dark hole in the nozzle tip for calibration. The exposure should be balanced. Meaning, sbright enough to distinguish the nozzle tip from the background but not so bright that the hole becomes difficult to detect. Aim for a setting where the brightest areas are visible but do not appear completely white, and the darker areas remain well-defined. Use the following images as a reference for adjusting exposure:
-
Record the Bottom Camera Exposure Value
- OpenPnP may not retain camera settings after restart Record and save your exposure value by saving them in a text file or writing them down.
- This means every time you boot up OpenPnP you'll have to:
- Toggle Auto Exposure
on, thenoff. (This puts your camera into manual exposure mode) - Type your recorded exposure value into the exposure field beside the slider.
- Toggle Auto Exposure
-
Apply and Save
- Click
Applyin the lower right corner to save your changes, if applicable. (OpenPnP may have the button greyed out. That is fine.)
- Save your OpenPnP configuration now.
File > Save Configuration.
- Click
Next Steps
Now that your LumenPnP V3 is connected, nozzle tips have been installed, and the bottom camera is configured, you're ready to proceed with Configuring Top Camera and Homing Fiducial.